Miter Saw Stand Installation: Stabilize your Projects
As you measure, mark, and master your workpieces, so too must you conquer the setup of your miter saw stand. Your quest for precision doesn’t end at the saw blade—it extends to the stability and adaptability of your stand.
You’re about to transform your workspace into a realm of efficiency and accuracy. By understanding how to assemble the stand, attach its legs, secure its surface, affix your saw, and adjust for perfect alignment, you’ll elevate your craftsmanship to new heights.
Dive into the details with confidence, knowing that each step you take is a stride towards unrivaled mastery in your projects. Let’s begin this journey into the heart of your woodworking arsenal, ensuring that your miter saw stand is not merely installed, but mastered.
Key Takeaways
- Familiarize yourself with the stand components and conduct an inventory check
- Take time to study the assembly diagram and lay out the parts in groups
- Ensure a sturdy foundation by aligning and securing the stand legs with bolts
- Affix the saw to the stand by aligning it with the mounting brackets and securing it with bolts
Understanding Stand Assembly
Know Your Stand Components
Hey there, fellow DIYer! Before we roll up our sleeves and dive headfirst into stand assembly, let’s take a moment to get chummy with the parts we’ll be working with. Trust me, knowing what’s what’s half the battle.
Inventory Check: Your New Best Friend
Start by playing matchmaker with the pieces and the inventory list. Got legs? Check. Supports? Check. The whole shebang of brackets, bolts, and nuts? Check, check, and double-check. It’s like a game of ‘Where’s Waldo?’ but with stand parts. And here’s a tip: lay out the parts in groups – think of it as organizing your tools before the real fun begins.
Assembly Diagram: Your Roadmap to Success
Next up, the assembly diagram. This isn’t just any old picture; it’s the blueprint of your future masterpiece. Every notch, bolt, and angle is there for a reason, so study it like it’s the last piece of chocolate cake at a birthday party—you want it all. Remember, you’re not just slapping pieces together; you’re creating a trusty workstation that’ll be the envy of your garage.
Take your time, and make sure you’ve got the lay of the land down pat. A little precision now means a lot less ‘oops’ later.
Alright, has that got your gears turning? Great! With these basics under your belt, you’re well on your way to assembly stardom. Let’s get to it, and remember – measure twice, assemble once!
Attaching Stand Legs
Aligning the Stand Legs
Alright, fellow DIYers, let’s roll up our sleeves and get to the nuts and bolts of assembling a miter saw stand that won’t wobble while you work.
Getting the legs attached just right is key. Start by lining up each leg with the mounting holes on the base. Take your time here; a little patience goes a long way toward ensuring your stand doesn’t turn into a wobbly mess. Remember, precision is your best friend in the world of tool assembly.
Securing the Foundation
Once you’ve got those legs aligned as if they were soldiers on parade, it’s time to secure them with bolts. Feed the bolts through the holes like you’re threading a needle—gently but with purpose. Grab your trusty wrench and tighten those bolts just right.
Here’s a pro tip: when you feel that firm resistance, stop. Over-tightening is the arch-nemesis of threads, and stripped threads are a headache no aspirin can cure.
Ensuring an Even Keel
With all legs snugly bolted in, grab your level. It’s the moment of truth! Place that level on the base and watch the bubble. Is it smack dab in the middle? If not, don’t fret. Make the necessary tweaks until your stand is as level as a pancake.
A perfectly horizontal stand is the secret sauce to spot-on cuts, and you, my friend, are on your way to creating masterpieces.
By walking through these steps with the care of a craftsman, you’ll have a solid foundation that’s ready to support your miter saw and all the projects you’ve got lined up.
There’s nothing quite like the feeling of power tools humming away on a stand you’ve pieced together with your own hands. So, pat yourself on the back—your miter saw stand is set to be as sturdy as a 100-year-old oak.
Securing Stand Surface
Assembling Your Stand Surface with Precision
Aligning for Stability
Let’s get down to business and attach that stand surface to the legs. You’ll want it to be as snug as a bug in a rug! Make sure it’s flush and stable before you even think about introducing your miter saw to its new home. It’s all about creating a rock-solid foundation, friends.
Reinforcing Connection Points
Now, you wouldn’t want any wiggles or jiggles while you’re making those precision cuts, would you? So let’s beef up those connection points. Bolts and locking nuts should be your go-to for a secure assembly. And hey, if your stand is going to be a heavyweight champion of the workshop, throw in some extra brackets for good measure.
Leveling the Playing Field
Take a minute here—grab a level and ensure your surface is as horizontal as the horizon. An off-kilter surface is the enemy of accuracy, and we’re in the business of spot-on cuts.
Tightening and Testing
Get a Grip with the Right Tools
Grab your wrench and get those fasteners snug. Not too tight, though—we’re not looking to strip anything. Just a firm, consistent pressure will do the trick. Remember Goldilocks? Aim for ‘just right’.
Stress Test for Assurance
Alright, time for a little workout. Push down on that surface in all different spots like you’re trying to find the squeaky board on the floor. It’s got to stand up to the push and pull of sawing, so let’s make sure it doesn’t flinch.
The Final Word on Meticulous Assembly
Putting it all together, this isn’t just about putting together a stand—it’s about creating a faithful ally for your woodworking projects. Every cut, every measurement, it all starts here with your stand. So take the time, do it right, and you’ll be set up for success. After all, in the world of DIY, the devil really is in the details, isn’t it?
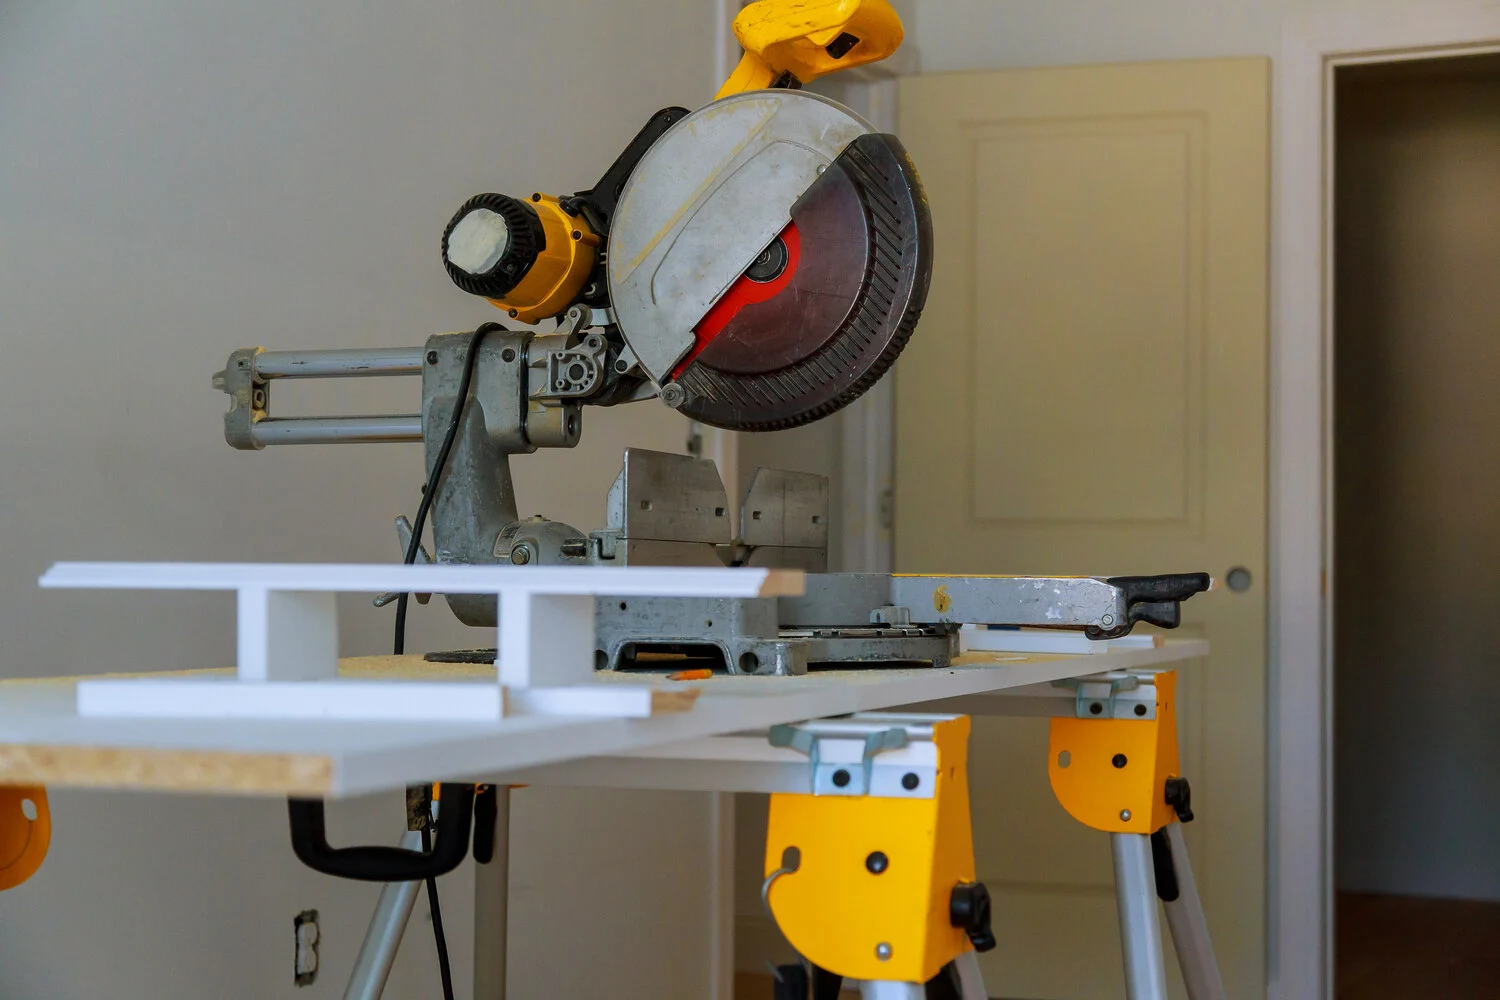
Affixing Saw to Stand
Aligning Your Miter Saw with Precision
Alright, fellow DIYers, let’s get down to business. You’ve got your stand all set up and ready to go—it’s a thing of beauty. But now comes a critical step: getting your miter saw properly perched on its throne. Precision is your best friend here, folks. Any slight misalignment, and you might as well be cutting with your eyes closed. So, how do you avoid a crooked catastrophe? Let me walk you through it.
First things first, you want to place your miter saw onto the stand with the finesse of a chess master making a game-winning move. Line up those mounting holes on the base of your saw with the mounting brackets on the stand like they’re long-lost puzzle pieces finally finding their place.
Securing the Saw with Bolts
Once you’ve got your saw aligned as if it’s been laser-measured, it’s time to bolt it down. Now, you might’ve a set of bolts that came with your stand, or you might need to fetch the right size for your particular saw. Either way, we’re not just screwing in lightbulbs here; we’re securing a power tool that means business.
Tighten those bolts evenly, my friends. We’re aiming for that ‘just right’ snugness—not too loose, not too tight, like Goldilocks finding the perfect bowl of porridge.
Ensuring Rock-Solid Stability
The final act in this saw-securing drama is the stability test. Give your miter saw a gentle nudge or a subtle shake—it should stand as firm as a century-old oak. Notice a bit of a wobble? No problem. Just give those bolts another twist until your saw is as stable as your faith in a well-made cup of morning coffee.
Once that saw doesn’t budge an inch, you can step back and admire your handiwork. You’ve just set the stage for countless accurate cuts and safe operations. You, my DIY friend, are ready to make some sawdust.
Adjusting Saw Alignment: Getting Your Miter Saw in Tip-Top Shape
Perfect Alignment: The Cornerstone of Precision
Ah, the thrill of embarking on a new project! You’re standing there, miter saw at the ready, itching to make that first slice through the wood. But hold on, partner! Have you given your saw a once-over for perfect alignment? Trust me, as someone who’s spent two decades covered in sawdust, the difference between a good cut and a great cut is all in the details.
Check Blade Perpendicularity
First things first, grab your trusty square. You’re going to want to ensure the blade is sitting square to the table. Not quite right? No worries. Just adjust the bevel angle until it’s as straight as an arrow. Remember, a little patience now will save you a heap of frustration later.
Blade and Fence: Parallel Universe
Next up, let’s talk about the blade and fence relationship. It’s like peanut butter and jelly—they’ve got to be in harmony. Whip out your measuring tape and check the distance from the fence to the blade at a few different points. Spot any inconsistencies? Time to tweak that fence until it’s parallel. Even the slightest misalignment can throw off your game, and who wants that?
Fine-Tuning: The Secret Ingredient
Here’s where you roll up your sleeves and get down to the nitty-gritty. Fine-tuning your saw isn’t just busywork; it’s what separates the DIY newbies from the seasoned pros. So, take a deep breath, focus, and make those micro-adjustments. Your dedication here will shine through in every cut, every join, every finished piece.
Frequently Asked Questions
Can I Use a Miter Saw Stand for Other Power Tools, or Is It Exclusively for Miter Saws?
You’re not limited to just miter saws; you can use the stand for other power tools as well, as long as it fits securely and the tool’s weight doesn’t exceed the stand’s capacity.
What Safety Precautions Should I Take When Using a Miter Saw on a Newly Installed Stand?
You should wear safety goggles, secure the saw to the stand, ensure the area’s clear, and always use push sticks or hold-downs to keep your hands away from the blade.
How Do I Maintain and Clean the Miter Saw Stand to Ensure Its Longevity and Optimal Performance?
To maintain and clean your miter saw stand, regularly wipe down surfaces, lubricate moving parts, and check for wear. Store it properly to protect from the elements and ensure optimal performance.
Are There Any Compatibility Issues to Consider When Purchasing a Stand for an Older or Non-Standard Miter Saw Model?
You’ll want to check the mounting hole pattern and base dimensions to ensure the stand fits your older or non-standard miter saw, preventing potential issues with compatibility and securing the tool properly.
Can I Modify the Miter Saw Stand to Improve Stability on Uneven Surfaces, or Should I Only Use It on Flat Ground?
You can modify your miter saw stand for better stability on uneven ground, but ensure the modifications don’t compromise the structure. Using it on flat surfaces is still the safest bet.
Final Thoughts
You’ve nailed it!
With the stand legs firmly in place and the surface secured, your miter saw is now a steadfast fixture.
After affixing the saw and tweaking the alignment, you’re ready to tackle any project.
Remember, the key to smooth cuts lies in the stability and precision of your setup.
So go ahead, make that first cut with confidence—your miter saw stand is the solid foundation for all your masterful creations.