How to Use a Wood Lathe – Beginner’s Guide to Woodturning
Welcome to the world of woodworking, where creativity meets craftsmanship! If you’ve ever wondered how skilled artisans turn blocks of wood into beautiful, intricate shapes, then using a wood lathe is the key to unlocking this captivating art form. In this article, we will guide you through the fundamentals of how to use a wood lathe, demystifying the process so you can get started on your own woodturning journey.
A wood lathe is a versatile tool that spins a piece of wood, allowing you to shape it with precision and finesse. Whether you want to craft elegant spindles, decorative bowls, or unique wooden art pieces, the wood lathe is your gateway to endless possibilities.
Safety will be our foremost concern, and we’ll cover all necessary precautions to ensure your woodturning experience remains enjoyable and injury-free. We’ll also walk you through the various components of a wood lathe, understanding their functions, and introduce the basic tools required to get you started.
So, put on your safety gear, grab your turning tools, and let’s begin this fascinating journey into the world of woodturning with the artful and practical guide on how to use a wood lathe!
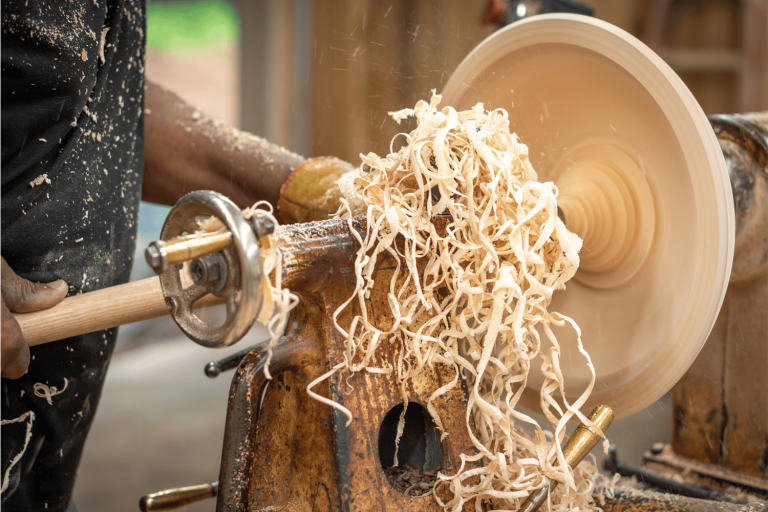
Understanding the Wood Lathe
Wood lathes are fascinating machines that bring woodworking projects to life. Before you start turning your wooden creations, it’s essential to understand the key components of a wood lathe and the different types available.
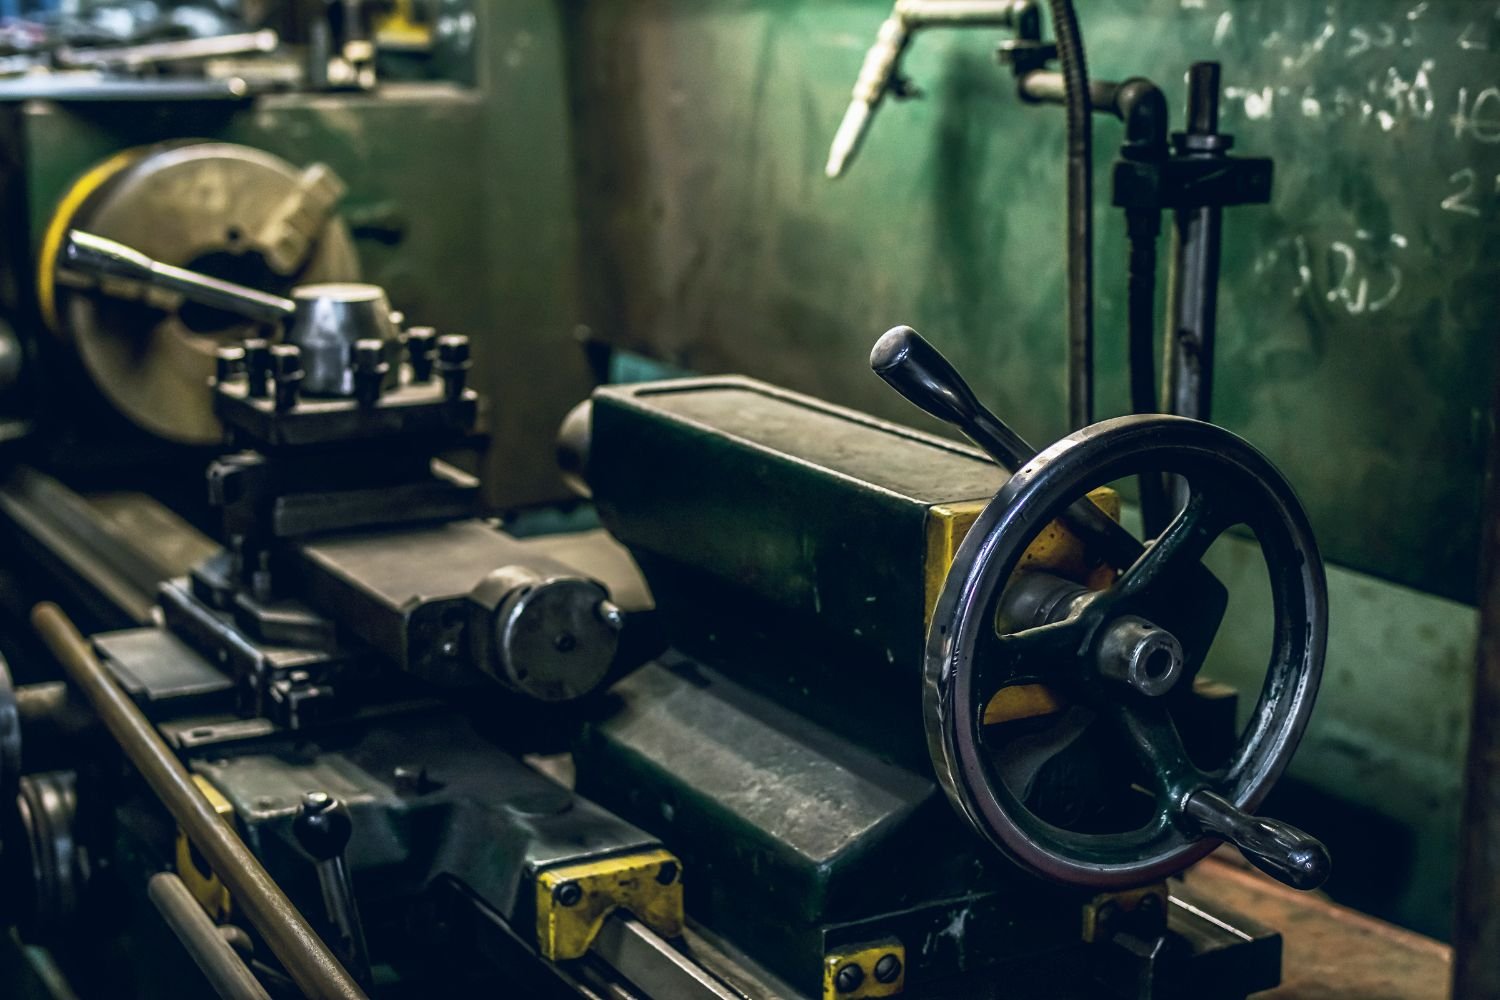
Components of a Wood Lathe
Bed
The bed is the sturdy base of the wood lathe that supports all its other components. It provides stability and ensures the smooth movement of the turning stock. The bed length determines the maximum size of the piece of stock you can work on.
Headstock
Located at one end of the lathe’s bed, the headstock houses the motor and spindle. The spindle is a rotating shaft that holds the workpiece in place during turning. Different lathes have varying spindle thread sizes to accommodate various accessories.
Tailstock
The tailstock is positioned at the opposite end of the headstock and consists of a quill that can be extended or retracted. It provides additional support to longer workpieces and holds accessories like drill chucks for boring holes in wood.
Tool Rest
The tool rest is a horizontal bar that attaches to the lathe’s bed and can be adjusted in height and position. It supports the turning tools and allows you to maintain consistent cutting depth while keeping your hands safe during the turning process.
Motor and Drive System
The motor powers the lathe and drives the spindle’s rotation. Some lathes have variable speed controls, enabling you to adjust the rotational speed to suit different projects and wood types.
Different Types of Wood Lathes
Benchtop Lathes
These are small lathes that are compact and portable, making them ideal for smaller workspaces and hobbyists. They offer versatility and are suitable for turning small to medium-sized projects.
Midi Lathes
Midi lathes are a step up from benchtop models, offering more power and capacity. They strike a balance between portability and functionality, making them popular among both beginners and experienced woodturners.
Full-Size Lathes
Full-size lathes are robust machines designed for heavy-duty projects and professional use. They offer ample power, large work capacities, and additional features for advanced turning techniques.
Understanding the components and types of wood lathes is the first step in mastering woodturning. As you become familiar with these essentials, you’ll be ready to embark on your wood lathe journey, creating impressive wooden masterpieces with skill and creativity.
Preparing for Lathe Work – Selecting Tools and the Type of Wood
Before you embark on your woodturning adventure, it’s crucial to prepare yourself and gather the necessary tools and materials. This section will guide you through the essential steps to get ready for your lathe work.
Selecting the Right Wood
The first step in wood lathe preparation is choosing the right wood stock for your project. Opt for well-seasoned hardwoods like maple, cherry, or walnut, as they are easier to turn and offer beautiful finishes. Green or wet wood can cause cracking and other issues during turning, so avoid using them.
Essential Tools and Equipment
Lathe Turning Tools
Turning tools are the heart of wood lathe work, and a basic set will include various types of gouges, chisels, and scrapers. For beginners, a spindle roughing gouge, a bowl gouge, and a parting tool are excellent starting points. As you gain experience, you can expand your collection to suit more complex projects.
Safety Gear
Safety should always be a top priority when using a wood lathe. Essential safety gear includes a face shield to protect your eyes and face from flying wood chips and debris. Additionally, a dust mask or respirator is vital to prevent inhaling fine wood particles, especially during sanding.
Measuring and Marking Tools
Accurate measurements are crucial for achieving the desired dimensions in your turned pieces. A quality caliper and a tape measure are useful for precise measurements, while marking tools like pencils and marking gauges help you outline your turning designs on the wood.
Woodworking Lathe Accessories
Various accessories can enhance your wood lathe experience. A live center in the tailstock provides additional support for long workpieces, and a four-jaw chuck allows you to hold irregularly shaped pieces securely. Additionally, a steady rest can be beneficial when turning delicate or thin items.
By preparing the right materials and gathering essential tools, you set yourself up for a successful and enjoyable woodturning experience. Remember that proper selection of wood and equipment significantly influences the quality of your finished turned pieces. Now that you’re well-prepared, let’s move on to the next exciting steps in our journey to master the art of using a wood lathe.
Safety Guidelines
Using a wood lathe can be a rewarding experience, but it’s essential to prioritize safety throughout your woodturning journey. By following these safety guidelines, you can ensure a safe and enjoyable woodworking experience.
Proper Workspace Setup
Before starting any wood lathe work, set up a dedicated workspace that is clean, well-lit, and free from distractions. Ensure that the lathe is placed on a sturdy, level surface to prevent vibrations during operation. Adequate space around the lathe is necessary for maneuvering and handling the wood pieces safely.
Using Personal Protective Equipment (PPE)
Always wear the appropriate Personal Protective Equipment (PPE) while using a wood lathe. The essential PPE includes a face shield to protect your eyes and face from flying wood chips and debris. Additionally, wearing a dust mask or respirator is crucial to prevent inhaling fine wood particles, especially during sanding, which can be harmful to your respiratory system.
Understanding the Wood Lathe’s Emergency Shut-Off
Familiarize yourself with the location and function of the wood lathe’s emergency shut-off switch. In case of any unexpected situations or accidents, you must be able to quickly and easily access the shut-off switch to stop the lathe’s rotation immediately.
Safe Lathe Operation Practices
When turning the wood, always stand on the lathe’s side, never in front of it. Keep your body at a safe distance from the spinning wood piece to avoid accidental contact. Use both hands to hold the turning tools securely, and maintain a firm grip on the handles.
Start with lower lathe speeds, especially when working on larger or irregularly shaped pieces, and gradually increase the speed as you gain confidence and control. Avoid removing too much wood at once to prevent sudden shifts in balance or vibrations.
Additionally, avoid wearing loose clothing or jewelry that could get caught in the lathe’s moving parts. Long hair should be tied back to prevent any entanglements.
By adhering to these safety guidelines, you can significantly reduce the risk of accidents and injuries while using a wood lathe. Remember, safety should always be your top priority, and practicing safe lathe operation practices will ensure a more enjoyable and fulfilling woodworking experience.
What You Need to Know to Get Started
Congratulations on taking the first step into the captivating world of woodturning! Let’s delve into the fundamental techniques that will get you started on your wood lathe journey.
Mounting the Wood Blank on the Lathe
Between Centers Turning
Between centers turning is a common method to mount a wood blank on the lathe. To do this, secure one end of the wood piece between the headstock and tailstock centers. Align the centers with the lathe’s spindle and tailstock quill to ensure the blank is centered accurately.
Faceplate Turning
For irregularly shaped or bowl-like projects, faceplate turning is the preferred method. Attach a faceplate to the wood blank using screws or wood glue. Mount the faceplate onto the lathe’s spindle and ensure it rotates smoothly.
Adjusting Tool Rest and Tailstock Alignment
Position the tool rest parallel to the lathe’s bed and adjust its height to match the center of the wood blank. This alignment will provide optimal support for your turning tools and help you maintain consistent cuts.
Next, adjust the tailstock alignment. If you’re using between centers turning, extend the tailstock quill to touch the other end of the wood blank. Align the tailstock center with the lathe’s spindle to ensure proper support.
Setting the Lathe Speed
The lathe’s rotational speed affects your turning experience and the quality of your work. For larger, heavier pieces, use lower speeds to maintain control. Conversely, higher speeds work well for smaller, delicate turnings.
Adjust the lathe speed according to the type of wood and the project you’re working on. Experiment with different speeds to find the one that suits your needs best.
Now that your wood blank is securely mounted, the tool rest is in place, and the lathe speed is set, you’re ready to embark on your woodturning journey! Keep practicing, be patient with yourself, and remember that mastery of woodturning comes with time and experience. Enjoy the process and let your creativity flow as you shape unique and beautiful wooden creations.
How to Use a Wood Lathe – Basic Woodturning Techniques
Once you have your wood blank securely mounted and your lathe set up, it’s time to dive into the essential woodturning techniques. These techniques will allow you to create various shapes and designs, turning your wood pieces into true works of art.
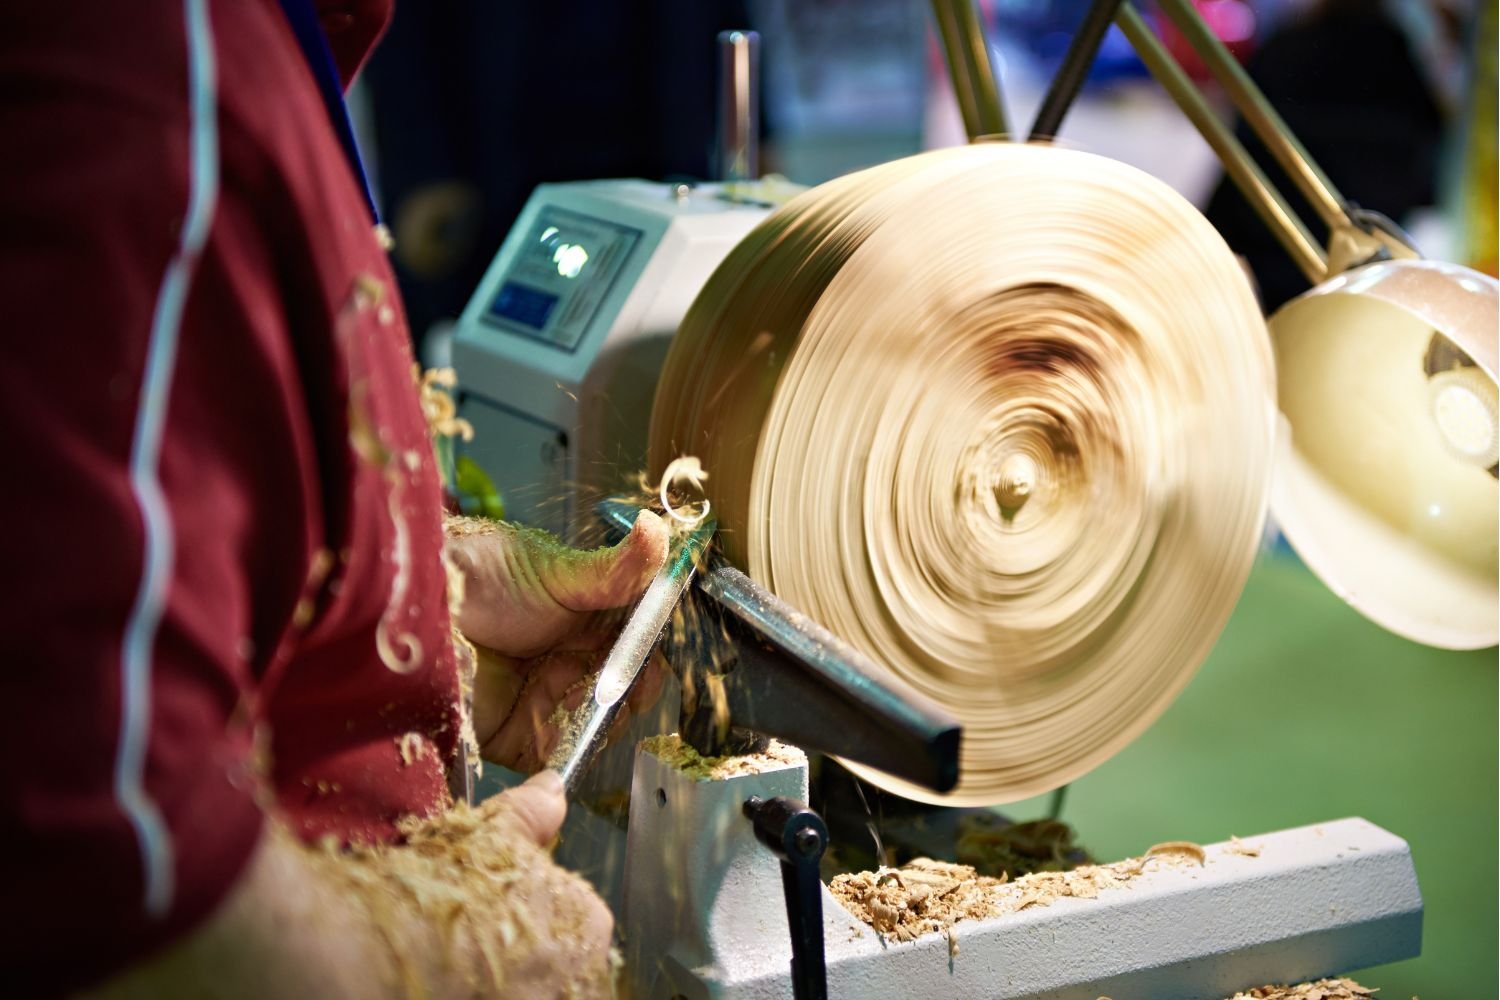
Spindle Turning
Creating a Cylindrical Shape
Spindle turning is one of the most common wood lathe techniques used to shape long, cylindrical pieces such as table legs, chair spindles, and handles. To create a cylindrical shape, position your tool rest parallel to the lathe’s bed and make sure the tool’s cutting edge is level with the center of the wood blank.
Using a spindle roughing gouge, begin removing excess wood to bring the blank closer to the desired diameter. Use smooth, even strokes, and maintain constant contact with the wood surface. Gradually shape the entire length of the blank into a perfectly cylindrical form.
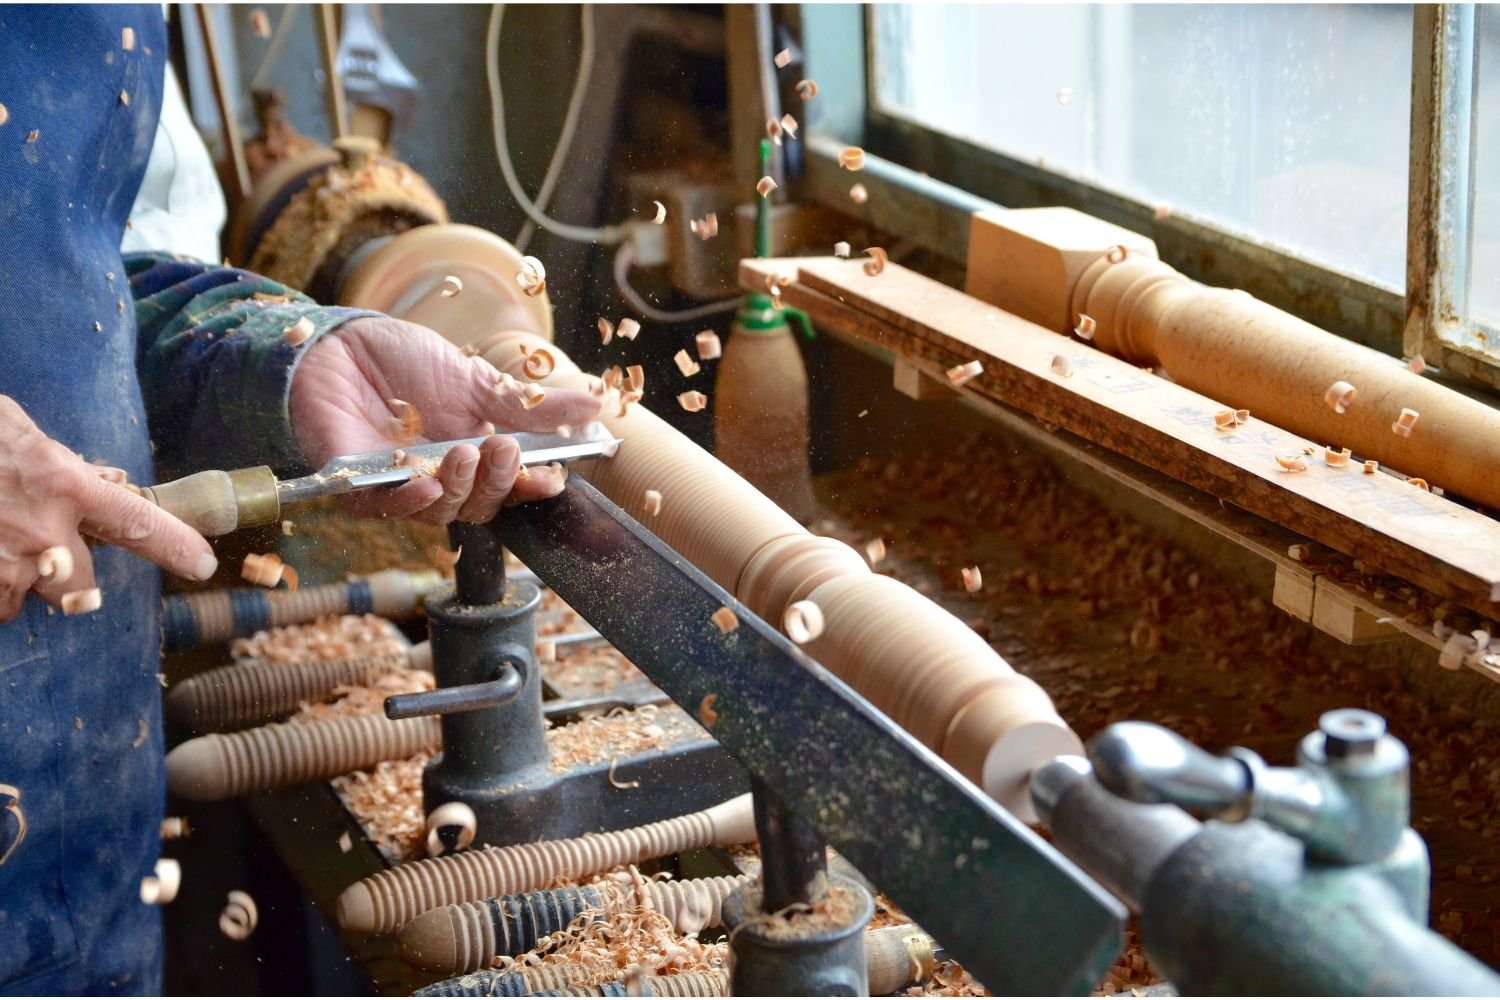
Adding Beads and Coves
Once you’ve achieved the cylindrical shape, you can enhance your work by adding decorative elements like beads and coves. To create beads, use a spindle gouge to cut small, rounded protrusions along the length of the spindle. To form coves, use a larger spindle gouge to create concave recesses between the beads.
Bowl Turning
Preparing the Bowl Blank
For bowl turning, start with a bowl blank that has been properly prepared and mounted on the lathe using faceplate turning. Secure the faceplate to the blank, ensuring a tight and stable fit.
Roughing Out the Shape
With the bowl blank mounted on the lathe, use a bowl gouge to rough out the basic shape of the bowl. Begin by cutting across the grain, gradually working your way from the center outward. As the bowl shape emerges, switch to cutting with the grain for smoother results.
Hollowing the Bowl
Once the outer shape is defined, it’s time to hollow out the bowl’s interior. Carefully use the bowl gouge to remove wood from the center, working from the rim towards the base. Take your time to achieve an even thickness, maintaining a smooth interior surface.
Creating Basic Woodturning Designs
With a good grasp of spindle and bowl turning techniques, you can explore your creativity by experimenting with basic woodturning designs. Play with different cuts, bead sizes, and cove depths to create unique patterns and shapes in your turned pieces. Embrace the artistic freedom of woodturning and let your imagination guide you.
Remember, mastering these basic woodturning techniques takes practice and patience. As you refine your skills, you’ll be amazed at the variety of beautiful and functional wooden creations you can bring to life.
Sharpening and Maintaining Lathe Cutting Tools
One of the most crucial aspects of using a wood lathe effectively is keeping your turning tools sharp and well-maintained. Sharp tools not only enhance the quality of your work but also make the woodturning process smoother and more enjoyable. Let’s explore the importance of sharp tools, different sharpening methods, and essential tool maintenance tips.
Importance of Sharp Tools
Using sharp turning tools is essential for achieving clean and precise cuts. Dull tools can lead to rough surfaces, tear-outs, and even safety hazards. Sharp tools require less effort to shape the wood, reduce the risk of accidents, and allow you to maintain better control over your cuts.
Understanding Different Sharpening Methods
There are various methods for sharpening turning tools, and each woodturner may have their preferred technique. The most common methods include:
- Grinding Wheels: Utilizing a grinding wheel mounted to the lathe or a bench grinder, this method quickly shapes the tool’s edge. However, it can generate heat and may require frequent water cooling to prevent damage to the steel.
- Sharpening Jigs: Jigs are helpful tools that ensure consistent and accurate tool sharpening angles. They can be used with grinding wheels or other sharpening systems.
- Diamond Sharpening Stones: These stones provide a flat and precise surface for sharpening. They work well for honing and refining the tool’s edge.
- Sharpening Systems: Several commercial sharpening systems are available that use abrasives and guides to simplify the sharpening process.
Tool Maintenance Tips
Proper tool maintenance extends the life of your turning tools and ensures they remain in optimal condition. Here are some essential tips:
- Clean Tools After Use: Wipe off any wood dust and debris from the tool’s surface after each use to prevent corrosion.
- Protect Edges: Use tool protectors or sleeves to shield the sharp edges of your turning tools when not in use.
- Regular Inspections: Periodically inspect your tools for cracks, chips, or other signs of damage. Replace or repair damaged tools promptly.
- Oil and Lubricate: Applying a thin coat of oil on your turning tools helps prevent rust and keeps them functioning smoothly.
- Avoid Overheating: When sharpening your tools, avoid excessive heat buildup as it can weaken the tool’s steel. Frequent cooling and light grinding pressure are recommended.
By prioritizing sharp tools and proper maintenance, you’ll enhance your woodturning experience and produce impressive pieces with precision and finesse. Remember, honing your skills in tool sharpening and maintenance is just as crucial as mastering the turning techniques themselves.
Advanced Techniques for Using a Lathe for Turning Wood
Once you have mastered the basic woodturning techniques and gained confidence in using a wood lathe, you may want to explore more advanced and artistic methods. While these techniques are optional, they can add depth and complexity to your turned pieces, elevating your woodturning skills to the next level.
Multi-axis Turning
Multi-axis turning involves tilting or adjusting the lathe’s headstock and tool rest to different angles. This technique allows you to create intricate, asymmetrical shapes and curves in your turned pieces. By turning the wood on multiple axes, you can achieve unique designs that traditional spindle or bowl turning cannot replicate.
Multi-axis turning requires practice and a keen understanding of how changing the lathe’s orientation affects the cutting path. Experimenting with different angles and exploring the three-dimensional possibilities can lead to stunning and imaginative woodturning creations.
Thread Chasing
Thread chasing is a specialized technique used to create threads on wooden pieces, similar to those found on bolts or screws. This technique is often used to craft decorative elements on boxes, finials, or other woodturned objects. To achieve threads, you’ll need a specialized threading tool with a pointed tip and matching pitch.
Thread chasing demands patience and precision, as the tool must follow a specific pattern to create the desired thread design. As you progress with this technique, you can experiment with different thread sizes and spacing to achieve various decorative effects.
Off-center Turning
Off-center turning is a fascinating technique that involves intentionally rotating the workpiece off its center axis while turning. This creates eccentric or wavy shapes, which can add an artistic flair to your woodturned pieces. Off-center turning is often used to produce vases, bowls, and other artistic forms.
To perform off-center turning, you’ll need to adjust the tool rest and tailstock to accommodate the off-center axis. As you turn, the wood blank will oscillate, resulting in visually stunning patterns and textures. Mastery of this technique requires a steady hand and a willingness to experiment with different off-center positions.
As you explore these advanced woodturning techniques, remember that they require a higher level of skill and precision. Take your time to practice and familiarize yourself with each technique. Don’t be afraid to make mistakes, as they can lead to unexpected and beautiful results. Embrace the creativity and challenge that advanced woodturning offers, and you’ll be rewarded with unique and breathtaking woodturned masterpieces.
Sanding and Finishing
Sanding and finishing are the final steps in the woodturning process that bring out the beauty and smoothness of your turned pieces. These critical steps add the perfect touch to your creations, making them ready for display or practical use.
Sanding Techniques for a Smooth Surface
Sanding is a crucial step in achieving a smooth and flawless surface on your turned wood pieces. Start by using coarse-grit sandpaper (around 80 or 100 grit) to remove any tool marks, ridges, or imperfections left from the turning process. As you progress, switch to finer-grit sandpapers (e.g., 150, 220, 320 grit) to achieve a silky-smooth surface.
Hold the sandpaper securely and move it along the turning piece, following the grain. Avoid applying excessive pressure, as the lathe’s rotation will do much of the work for you. Continue sanding until you achieve a consistent and smooth surface across the entire piece.
Selecting the Right Finish
Choosing the appropriate finish is essential for protecting and enhancing the appearance of your woodturned item. There are various types of finishes available, such as oils, varnishes, waxes, and lacquers. Each finish offers unique characteristics and levels of protection.
For a natural and low-luster look, consider using a penetrating oil finish. Varnishes and lacquers provide a durable protective layer with a glossy appearance. Waxes can offer a soft sheen and a smooth touch.
When selecting a finish, consider the wood type, the intended use of the item, and your desired aesthetic. Always follow the manufacturer’s instructions and test the finish on a small, inconspicuous area before applying it to the entire piece.
Applying the Finish to the Turned Piece
Before applying the finish, ensure that the wood surface is clean and free from dust. Wipe down the piece with a soft cloth or tack cloth to remove any debris.
Using a brush, cloth, or spray, evenly apply the finish to the wood surface. Work in a well-ventilated area, and allow the finish to dry completely between coats. Depending on the finish type and manufacturer’s instructions, you may need to apply multiple coats for optimal results.
After the final coat has dried, gently buff the surface with a soft cloth to enhance the finish’s luster and smoothness.
With the sanding and finishing complete, your woodturned piece is now ready to be admired and cherished. Remember that sanding and finishing require attention to detail and patience, but the results are well worth the effort. Enjoy the satisfaction of seeing your wood lathe project transform into a polished and stunning work of art.
Troubleshooting Common Issues When Using the Lathe
While woodturning can be a gratifying experience, it’s not uncommon to encounter some challenges along the way. Understanding how to troubleshoot common issues will help you maintain control over your wood lathe and produce better results. Let’s explore some common problems and how to address them effectively.
Vibration Problems
Vibrations during woodturning can result in uneven surfaces and diminished precision. To reduce vibrations, consider the following steps:
- Secure Lathe Base: Ensure your wood lathe is placed on a stable and level surface. Tighten all bolts and fasteners to minimize any movement.
- Balanced Wood: Check that your wood blank is balanced and properly mounted. If the blank is unevenly weighted, it can cause vibrations during turning.
- Lathe Speed: Adjust the lathe speed to match the size and type of wood you’re working on. Lower speeds are generally more suitable for larger or off-center pieces.
- Sturdy Tool Rest: Make sure the tool rest is securely fastened and aligned with the turning piece. A wobbly tool rest can contribute to vibrations.
Chatter Marks
Chatter marks are unwanted repetitive patterns on the surface of your turned piece, caused by various factors. To address chatter marks:
- Sharp Tools: Ensure your turning tools are sharp, as dull tools can lead to chatter marks. Sharpen them using the appropriate method discussed earlier.
- Reduce Overhang: Minimize the amount of tool overhang beyond the tool rest. A shorter overhang provides better tool support and reduces vibrations.
- Light Cuts: Take light cuts rather than heavy ones, especially when roughing out the shape. Gradually work your way to the desired dimensions to avoid excessive stress on the tool and workpiece.
Tool Catches and Digs
Tool catches and digs occur when the woodturning tool gets caught or digs into the wood, leading to potential damage to the piece or the tool. To prevent these issues:
- Tool Presentation: Present the tool to the wood at the correct angle and with a light touch. Avoid approaching the wood too aggressively, as this can lead to catches.
- Smooth Movement: Ensure smooth and controlled movements while turning. Sudden or jerky motions can cause the tool to dig into the wood.
- Practice and Patience: Mastering tool control takes practice and patience. As you gain experience, you’ll develop a better feel for the proper tool presentation and movements.
Remember, troubleshooting and overcoming these issues are all part of the learning process. Don’t be discouraged if you encounter challenges along the way. Embrace them as opportunities to refine your woodturning skills and knowledge. By applying the appropriate techniques and adjustments, you’ll soon overcome these common problems and produce beautiful woodturned pieces with confidence and finesse.
Final Thoughts
Congratulations on completing this comprehensive guide on how to use a wood lathe! Through this journey, you’ve learned the essential components of a wood lathe, safety precautions, basic and advanced woodturning techniques, and how to troubleshoot common issues.
Remember, woodturning is an art that thrives on practice and dedication. Don’t hesitate to start with simple projects and gradually challenge yourself with more complex designs. Embrace mistakes as opportunities for growth and improvement, and never forget the importance of safety in every step of the process.
As you embark on your wood lathe adventure, surround yourself with the community of fellow woodworkers who share your passion. Engage in workshops, watch tutorials, and seek inspiration from others’ creations.
Whether you’re turning functional items or decorative pieces, let your creativity flow, and enjoy the satisfaction of seeing raw wood transformed into exquisite masterpieces. So, set up your lathe, grab your tools, and let your imagination soar in the world of woodturning!