The Miter Saw – Everything You Need to Know
When it comes to woodworking, having the right tools can make all the difference. One such tool that has gained immense popularity among craftsmen and DIY enthusiasts alike is the miter saw. But what exactly is a miter saw? Simply put, a miter saw is a specialized power tool designed to make precise and angled cuts in various materials, particularly wood. Its primary purpose is to create clean, accurate miter cuts and crosscuts, making it an indispensable tool for woodworking projects.
The significance of a miter saw in woodworking cannot be overstated. Its ability to make accurate angled cuts allows craftsmen to achieve seamless joints, create intricate designs, and produce professional-quality results. Whether you’re working on crown molding, picture frames, or furniture pieces, the miter saw provides the precision and versatility needed to bring your vision to life.
Miter saws are not limited to one specific type of cut. They can perform straight crosscuts, bevel cuts, and compound cuts, making them suitable for a wide range of woodworking applications. With their ability to pivot and tilt the blade, miter saws allow you to effortlessly create angled cuts at various degrees, giving you the flexibility to tackle complex projects with ease.
In this comprehensive guide, we’ll delve into the world of miter saws, exploring their different types, components, and features. We’ll help you understand how to choose the right miter saw based on your project requirements, budget, and specific needs. Additionally, we’ll emphasize the importance of safety precautions and provide you with essential tips for using a miter saw effectively and responsibly.
We’ll also cover maintenance and care, as well as introduce you to various accessories and enhancements that can elevate your woodworking experience with a miter saw. For those looking to expand their skills, we’ll touch on advanced techniques and projects that can be accomplished using this remarkable tool.
So, whether you’re a seasoned woodworker or a passionate DIYer, get ready to unlock the potential of the miter saw and take your woodworking projects to new heights of precision and creativity.
Understanding Miter Saws
Different Types and Variations of Miter Saws
Miter saws come in various types and configurations, each catering to different woodworking needs. The two primary types of miter saws are the basic and the compound miter saw. These can be further broken down into corded and cordless miter saws. The basic miter saw allows you to make miter cuts at different angles, while the compound miter saw adds the ability to make bevel cuts by tilting the blade. Additionally, there are sliding compound miter saws that have a sliding feature to handle wider workpieces.
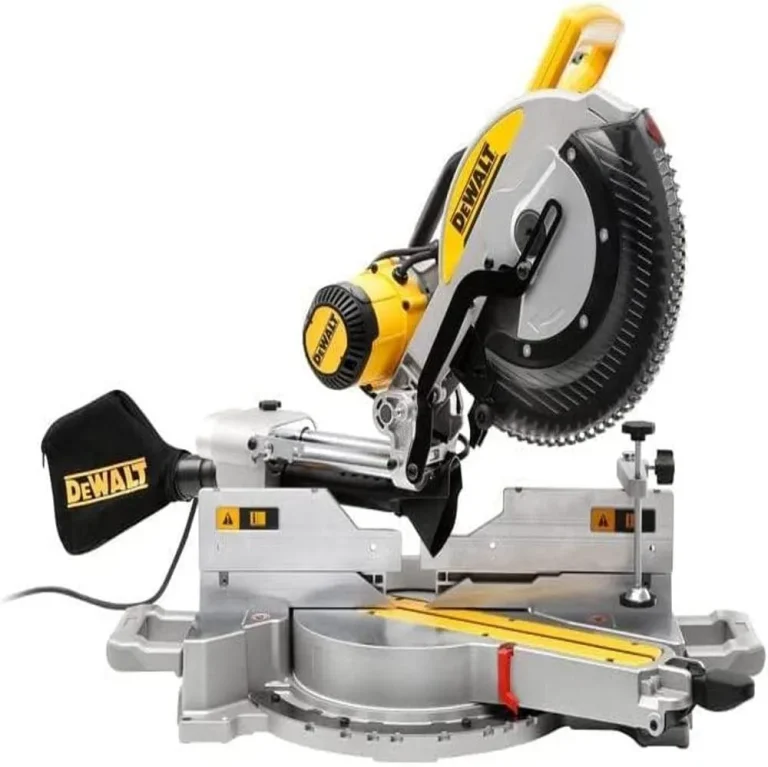
Key Components and Features of a Miter Saw
To fully comprehend the functionality of a miter saw, it’s essential to familiarize yourself with its key components. The most prominent component is the circular blade, which is responsible for making the cuts. Most miter saws also feature a cutting platform or table, an arm or rail system for sliding, and an adjustable fence that helps secure the workpiece in place. Furthermore, many miter saws come equipped with laser guides, dust collection systems, and blade guards to enhance accuracy, cleanliness, and safety.
Benefits and Advantages of Using a Miter Saw
Using a miter saw offers several significant benefits in woodworking projects. First and foremost, a miter saw provides unparalleled precision and accuracy in making angled cuts. The ability to set precise angles and bevels ensures clean, tight joints, resulting in professional-looking finished products.
Miter saws are also known for their efficiency and speed. With a properly calibrated and well-maintained miter saw, you can achieve swift and consistent cuts, saving valuable time during your woodworking projects. A sliding miter saw further expands the capacity for handling larger workpieces, allowing you to tackle a wider range of projects with ease.
Another advantage of using a miter saw is its user-friendly nature. The setup and operation of a miter saw are relatively straightforward, making it accessible to both beginners and experienced woodworkers. Once you understand the basics, you can quickly master the art of creating precise cuts and angles, empowering you to take on more intricate and advanced woodworking tasks.
Miter saws offer exceptional accuracy, efficiency, and user-friendliness in woodworking projects. Whether you’re working on simple home improvements or intricate furniture designs, a miter saw is an indispensable tool that will elevate your craftsmanship and help you achieve remarkable results.

Choosing the Right Miter Saw
Assessing Project Requirements and Goals
Before diving into the world of miter saws, it’s crucial to assess your project requirements and woodworking goals. Consider the types of projects you typically undertake and the specific cuts you need to make. Are you working on small-scale DIY projects or larger, professional-grade woodworking ventures? Understanding your unique needs and aspirations will guide you in selecting the right miter saw that aligns with your woodworking objectives.
Considering the Different Sizes and Capacities of Miter Saws
Miter saws come in various sizes and capacities, each designed to handle different workpiece dimensions. Smaller miter saws are ideal for compact workshops or light-duty tasks, while larger ones offer increased cutting capacity and versatility. Consider the maximum width and thickness of the materials you commonly work with, ensuring that the miter saw you choose can accommodate them comfortably.
Exploring Various Features and Functionalities for Specific Needs
As you explore different miter saw models, it’s essential to evaluate the features and functionalities that align with your specific needs. Look for features like adjustable bevel angles, positive stops, and a clear, easy-to-read miter scale. Laser guides or LED lighting can enhance accuracy, while a dust collection system helps keep your workspace clean. Additionally, consider the presence of a sliding feature, which expands the saw’s cutting capacity for wider workpieces.
Evaluating Budget Constraints and Value for Money
While it’s tempting to focus solely on the price tag, it’s important to evaluate the overall value for money when choosing a miter saw. Set a budget range that suits your financial situation, and consider the long-term benefits and durability of the saw you’re considering. Remember, a quality miter saw can be a valuable investment that lasts for years, providing reliable performance and precise cuts. Look for reputable brands with positive customer reviews to ensure you’re getting the best possible value within your budget.
By carefully assessing your project requirements, considering the size and capacity of miter saws, exploring features and functionalities, and evaluating your budget, you can make an informed decision when selecting the right miter saw. This thoughtful approach will ensure that you invest in a tool that meets your specific needs, enabling you to achieve the best results in your woodworking endeavors.
Safety Precautions and Best Practices
Importance of Safety When Using a Miter Saw
When it comes to using a miter saw, safety should always be the top priority. This powerful tool can deliver precise and efficient cuts, but it also poses potential risks if not handled with care. Understanding and adhering to safety precautions is essential to protect yourself and others in the workshop.
Protective Gear and Equipment for Safe Operation
Before operating a miter saw, it’s crucial to equip yourself with the appropriate protective gear. Safety glasses are a must to shield your eyes from flying debris. Additionally, wearing hearing protection can help safeguard your ears from the loud noise generated by the saw. For added safety, consider wearing a dust mask to avoid inhaling sawdust and debris.
Proper Setup and Calibration of the Miter Saw
To ensure safe operation, it’s vital to set up and calibrate your miter saw correctly. Start by ensuring that the saw is placed on a stable surface and securely fastened. Adjust the blade to the appropriate height, making sure it clears the material without excessive exposure. Take the time to calibrate the angles and bevels, following the manufacturer’s instructions meticulously.
Essential Safety Tips and Techniques to Prevent Accidents
Maintain a clear workspace: Clear away any clutter or obstructions near the miter saw to prevent accidents and allow for unrestricted movement.
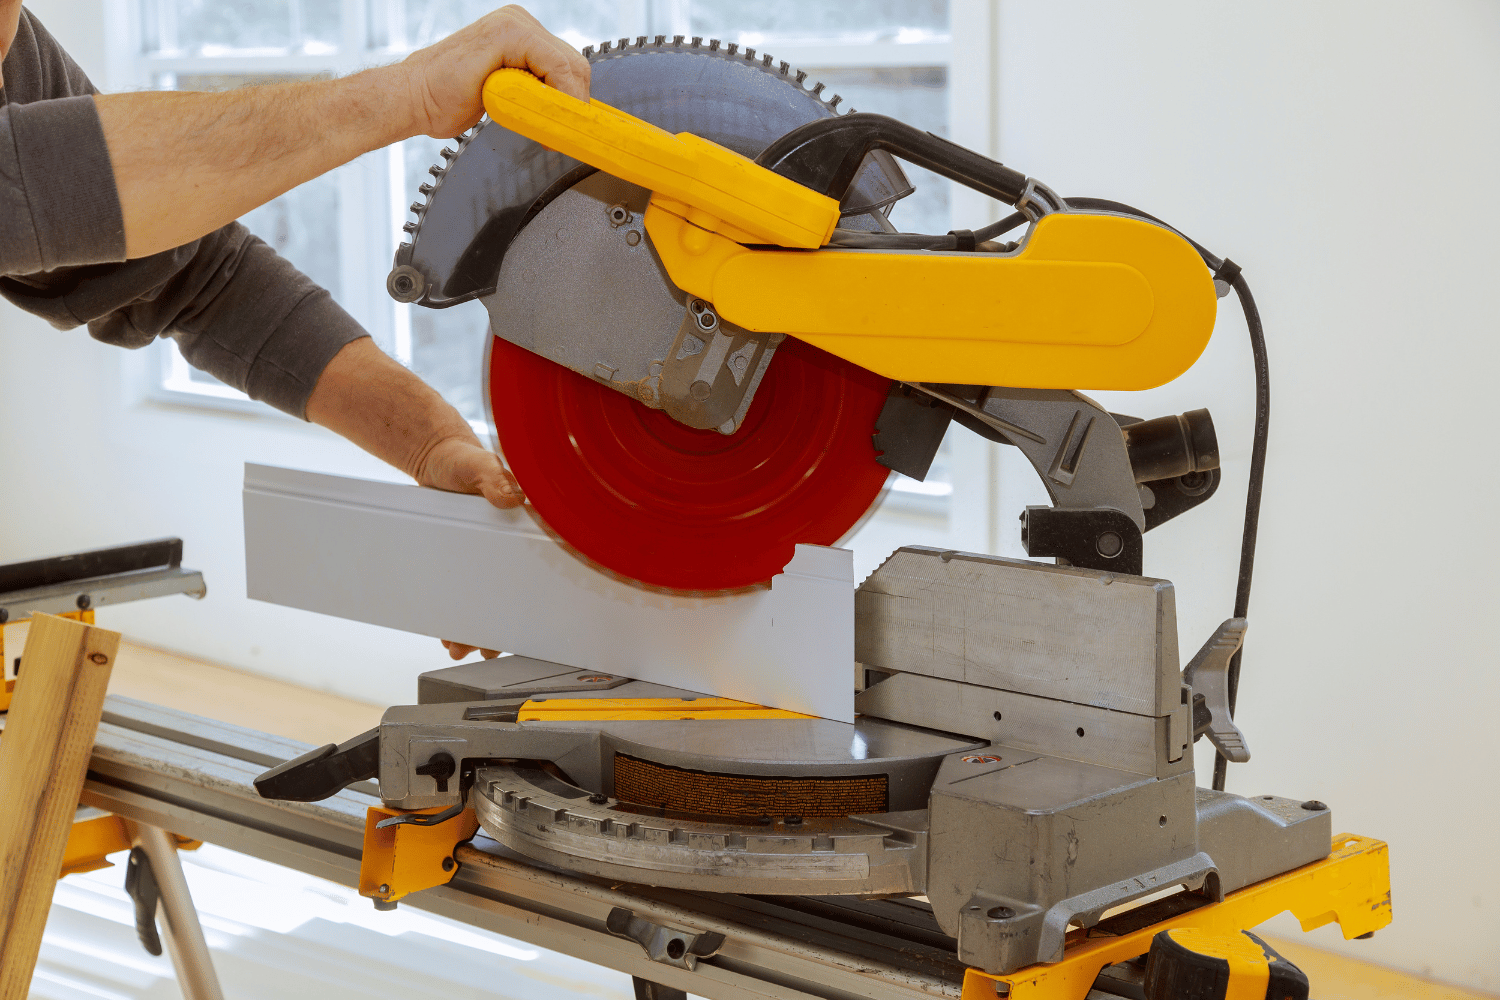
Secure the workpiece: Always use clamps or a vise to secure the workpiece firmly before making any cuts. This minimizes the risk of the material shifting or causing kickback.
Use the appropriate blade: Ensure that you are using the correct blade for the specific material you are cutting. The blade’s teeth should be sharp and in good condition to prevent binding and kickback.
Keep hands clear of the blade: Never reach across or near the blade while it is spinning or in motion. Use push sticks or other designated tools to guide the workpiece through the cut, keeping your hands at a safe distance.
Wait for the blade to come to a complete stop: Avoid rushing to remove or adjust the workpiece immediately after a cut. Wait for the blade to stop spinning completely before making any changes or clearing debris.
Stay focused and avoid distractions: Woodworking requires concentration and focus. Avoid distractions, such as loud music or conversations, that may compromise your attention to the task at hand.
By understanding the importance of safety, wearing the necessary protective gear, setting up the miter saw correctly, and following essential safety tips, you can significantly reduce the risk of accidents and create a safer working environment. Remember, prioritizing safety not only protects you but also ensures a more enjoyable and productive woodworking experience.

Mastering Miter Saw Techniques
Basic Miter Cuts
To fully utilize the capabilities of a miter saw, it’s essential to master the basic miter cuts. Crosscuts are the most straightforward, involving cutting the workpiece perpendicular to its length. Bevel cuts, on the other hand, involve tilting the blade at an angle while maintaining a straight cut. Compound cuts combine both miter and bevel angles, resulting in more complex and intricate cuts. Understanding these fundamental cuts will enable you to tackle a wide range of woodworking projects with precision and creativity.
Understanding the Miter Saw’s Angles and Adjustments
The miter saw offers various angle adjustments to achieve the desired cuts. Familiarize yourself with the miter gauge, which allows you to set the miter angle for angled cuts. The bevel gauge enables you to tilt the blade to create bevel cuts. Additionally, many miter saws have positive stops at common angles, making it easier to achieve accurate and repeatable cuts. Take the time to understand the markings, scales, and adjustments on your miter saw to unlock its full potential.
Tips and Tricks for Precise and Accurate Cuts
To achieve precise and accurate cuts with a miter saw, consider the following tips and tricks:
- Measure twice, cut once: Double-check your measurements before making any cuts to ensure accuracy and minimize material waste.
- Use a sharp blade: A sharp blade not only ensures cleaner cuts but also reduces the risk of kickback. Regularly inspect and replace the blade as needed.
- Support the workpiece: Use auxiliary supports or extensions to provide additional stability and prevent the material from sagging or vibrating during the cut.
- Secure small workpieces: When cutting smaller pieces, use a sacrificial backer board or clamp them to a larger workpiece to ensure safety and stability.
- Make test cuts: Before cutting into your final workpiece, practice on scrap material to fine-tune your technique and verify the accuracy of your measurements and adjustments.
Common Mistakes to Avoid When Using a Miter Saw
While mastering miter saw techniques, it’s important to be aware of common mistakes and pitfalls to avoid. Some common errors include:
- Rushing through cuts: Take your time and maintain a steady pace. Rushing can compromise accuracy and increase the risk of accidents.
- Neglecting safety measures: Always prioritize safety by wearing protective gear, securing the workpiece, and following proper operating procedures. Cutting corners on safety can have severe consequences.
- Ignoring proper maintenance: Regularly clean and maintain your miter saw to ensure optimal performance. Neglecting maintenance can result in decreased accuracy, blade deflection, and potential safety hazards.
- Using dull blades: A dull blade can lead to rough cuts, burning, and kickback. Keep your blades sharp or replace them when necessary to achieve clean and precise results.
By mastering miter saw techniques, understanding the angles and adjustments, implementing tips for accuracy, and avoiding common mistakes, you’ll become more proficient in using this powerful tool. With practice, you’ll develop the skills and confidence to tackle woodworking projects with precision, creativity, and remarkable results.

Miter Saw Accessories and Enhancements
Overview of Popular Accessories for Miter Saws
Miter saw accessories can enhance the functionality and versatility of your tool, taking your woodworking projects to the next level. Some popular accessories include:
- Miter saw stands: Sturdy and adjustable stands provide a stable and ergonomic work surface, making it easier to handle long workpieces and improve overall cutting accuracy.
- Extension wings: These extensions attach to the sides of the miter saw table, creating additional support for longer materials and increasing the overall workpiece capacity.
- Clamps and hold-downs: These accessories help secure the workpiece firmly in place, minimizing movement and ensuring precise cuts.
- Dust collection systems: Dust collection attachments and bags help keep your workspace clean by capturing sawdust and debris, improving visibility and air quality.
Upgrades and Enhancements to Improve Productivity
There are several upgrades and enhancements available for miter saws that can improve productivity and efficiency:
- Laser guides: Laser guide systems project a thin, visible line onto the workpiece, providing a visual reference for accurate cuts and improved precision.
- Digital displays: Some advanced miter saw models come equipped with digital displays that show the exact angle and bevel settings, eliminating guesswork and enhancing accuracy.
- Blade upgrades: Upgrading to high-quality, specialized blades can improve cutting performance and produce cleaner, smoother cuts in different materials.
- LED task lighting: LED lights integrated into the miter saw provide better visibility of the work area, especially when working in poorly lit environments.
Understanding the Use of Jigs and Fixtures for Specialized Cuts
Jigs and fixtures can be invaluable when it comes to making specialized cuts with a miter saw. Some common examples include:
- Sleds: A sled is a sliding fixture that holds the workpiece securely and helps guide it through the cut at specific angles or bevels.
- Crown molding jigs: These jigs are designed specifically for cutting crown molding, allowing for accurate and precise miter and bevel cuts.
- Picture frame jigs: Picture frame jigs assist in making perfectly mitered corners for picture frames or other decorative projects.
Using these jigs and fixtures simplifies complex cuts, improves accuracy, and saves time during your woodworking projects.
Exploring Advanced Features and Add-Ons for Professional Woodworkers
For professional woodworkers or those seeking advanced features, there are additional options available:
- Dual bevel capability: Dual bevel miter saws allow you to tilt the blade in both directions, making compound cuts more convenient and efficient.
- Sliding miter saws: These saws feature a sliding mechanism that enables you to cut wider workpieces, expanding your project possibilities.
- Automatic blade brakes: Some miter saws come equipped with blade brakes that stop the blade quickly after making a cut, increasing safety and productivity.
- Wireless connectivity: Advanced miter saw models offer wireless connectivity options, allowing you to connect to mobile devices or computers for enhanced control and automation.
By exploring these accessories, upgrades, jigs, and advanced features, you can tailor your miter saw to suit your specific woodworking needs, boost productivity, and achieve exceptional results in your projects. Choose accessories and enhancements that align with your goals and preferences, and enjoy the added convenience and capabilities they bring to your woodworking journey.
Maintenance and Care for Miter Saws
Cleaning and Lubrication to Ensure Smooth Operation
Regular cleaning and lubrication are essential for keeping your miter saw in optimal condition and ensuring smooth operation. After each use, remove any sawdust, debris, and buildup from the saw’s surfaces, blade guard, and cutting area. Use a brush or compressed air to clean hard-to-reach areas. Lubricate moving parts, such as the pivot points and slides, using a recommended lubricant to prevent rust and ensure smooth movement.
Blade Maintenance and Replacement
Proper blade maintenance is crucial for achieving clean and precise cuts. Regularly inspect the blade for any signs of damage, such as chipped or dull teeth. Clean the blade with a blade cleaner or a mild solvent to remove resin or pitch buildup. If the blade is excessively worn or damaged, replace it with a new one to maintain optimal cutting performance. Follow the manufacturer’s instructions for blade installation and ensure it is securely tightened.
Calibration and Alignment for Accurate Cuts
Maintaining proper calibration and alignment is vital for achieving accurate cuts with your miter saw. Check the squareness of the blade and the fence by making test cuts on a scrap piece of wood. Use a square to verify that the blade is perpendicular to the table and that the fence is aligned correctly. If adjustments are needed, consult the user manual or seek professional assistance to calibrate and align your miter saw accurately.
Storing and Protecting the Miter Saw When not in Use
When your miter saw is not in use, proper storage and protection will help prolong its lifespan. Store the saw in a clean and dry area to prevent rust and corrosion. If possible, cover the saw with a dust cover or a cloth to shield it from dust and debris. If you need to transport the miter saw, use a sturdy carrying case or box to protect it from impacts and ensure its safe transportation.
Remember to always follow the manufacturer’s guidelines for maintenance and care specific to your miter saw model. By implementing regular cleaning, lubrication, and blade maintenance, as well as ensuring proper calibration and alignment, you can extend the life of your miter saw and maintain its performance over time. Taking the necessary steps to store and protect the saw when not in use will further safeguard your investment and keep it ready for your next woodworking project.
Final Thoughts
Throughout this article, we have delved into the world of miter saws and uncovered their importance and versatility in woodworking projects. The best miter saws provide the ability to make precise crosscuts, bevel cuts, and compound cuts, allowing woodworkers to tackle a wide range of projects with accuracy and creativity. From simple DIY tasks to complex furniture making, the miter saw is a reliable companion that enhances efficiency and delivers outstanding results.
As you consider purchasing a miter saw, remember to assess your project requirements and woodworking goals. Take into account the different sizes and capacities of miter saws to ensure it aligns with your needs. Explore the various features and functionalities available, such as laser guides, digital displays, and bevel capabilities, that can improve accuracy and productivity. Consider your budget constraints and prioritize value for money by investing in a reliable and reputable brand.
The journey with a miter saw doesn’t end here. As you gain confidence and proficiency, don’t shy away from further exploration and experimentation. Challenge yourself to take on new projects and push the boundaries of your creativity. Embrace the versatility of the miter saw by exploring different materials, angles, and joinery techniques. The miter saw is a tool that rewards innovation and encourages woodworkers to continuously expand their skills.
By understanding the different types, features, and techniques associated with miter saws, you can make informed choices when purchasing, using, and maintaining this remarkable tool. Embrace the challenges, learn from your experiences, and let the miter saw be your trusted companion on your woodworking journey. With each cut and project, you’ll witness the immense value that a miter saw brings to your craftsmanship.