How to Use a Framing Nailer Safely and Effectively
Are you looking to take on a framing project and want to make sure you use a framing nailer safely and effectively? Look no further! In this article, we will guide you through the ins and outs of using a framing nailer, ensuring that you have all the information you need to complete your project with precision and confidence.
Before diving into the nitty-gritty details, it’s essential to understand what a framing nailer is and how it works. We’ll also walk you through the necessary steps for preparing for safe operation, such as wearing appropriate safety gear and setting up your workspace correctly.
Choosing the right nails and air pressure is crucial for successful nailing. We’ll help you navigate these choices so that your work is secure and durable.
Once everything is set up correctly, we’ll show you proper techniques for operating your framing nailer efficiently. From holding it securely to maintaining control throughout each nailing process – we’ve got you covered.
Lastly, we will discuss important safety guidelines and best practices to ensure that both you and those around you stay safe while working with this powerful tool.
So let’s dive in together and master the art of using a framing nailer safely and effectively!
Key Takeaways
- Proper positioning and alignment of the framing nailer is crucial for safe and effective operation.
- Regular maintenance and inspection of the framing nailer is necessary for optimal performance.
- Selecting the right nails and air pressure is important for secure and professional results in framing projects.
- Always wear appropriate safety gear such as gloves and eye protection when using a framing nailer.
Understanding Framing Nailers
If you’re looking to tackle a big construction project, a framing nailer is an essential tool to have in your arsenal. This powerful tool is designed to drive nails into wood quickly and efficiently, making it ideal for tasks like framing walls or building decks.
There are different types of framing nailers available, including pneumatic (air-powered), cordless, and gas-powered models. Each type has its own advantages and considerations, so it’s important to choose the one that best suits your needs and preferences.
What is a Framing Nailer and What is its Primary Purpose
To use a framing nailer safely and effectively, you need to understand what it is and its primary purpose.
A framing nailer is a powerful tool used in woodworking that allows you to drive nails into wood quickly and efficiently. Its primary purpose is to secure pieces of lumber together, making it an essential tool for construction projects such as building walls or decks.
Using a pneumatic framing nailer requires an air compressor and hose to power the tool. The compressed air drives the nails into the wood with precision and speed, saving you time and effort compared to using a hammer. This tool can handle large nails, ranging from 2 to 3.5 inches in length, ensuring sturdy connections.
Understanding the basics of operating a framing nailer is crucial for safety and effectiveness.
Now let’s delve into describing the different types of framing nailers available.
Different Types of Framing Nailers
When choosing a framing nailer, you have various options to consider. For larger projects, the coil-style pneumatic nailer is ideal as it holds more nails. If you prefer greater mobility, the cordless framing nailer is a good choice, although it requires regular charging. For those who prefer a lightweight tool, the compressed air framing nailer may be the best option. Whichever type you select, all framing nailers work by driving a nail into the wood to fasten it securely.
To use a framing nailer effectively, proper positioning of the tool is crucial. Make sure to hold it firmly against the surface and align it correctly before pulling the trigger. There are different types of triggers available on framing nailers, including sequential and bump triggers. Sequential triggers require you to press the safety tip against the material and then pull the trigger each time you want to drive a nail. On the other hand, bump triggers allow rapid firing by simply pressing down on the safety tip repeatedly while holding down the trigger.
Now that you understand the different types of framing nailers available, let’s move on to preparing for safe operation without compromising efficiency in using this powerful tool.
Preparing for Safe Operation
Before you begin operating a framing nailer, it’s crucial to take proper safety precautions and wear the necessary protective gear. Familiarize yourself with the components of the framing nailer, including the trigger, depth adjustment, and magazine.
Additionally, ensure that you perform regular maintenance on your framing nailer and inspect it before each use to guarantee its proper functioning.
Safety Precautions and Protective Gear
Ensure you have the necessary protective gear and follow safety precautions when using a framing nailer to ensure your well-being. Before operating a framing nailer, it’s crucial to take certain safety measures.
Here are three essential safety precautions and protective gear you should consider:
- Eye Protection: Wear safety glasses or goggles to shield your eyes from flying debris, such as wood chips or nails.
- Hearing Protection: Use earplugs or earmuffs to protect your ears from the loud noise generated by the framing nailer.
- Glove Usage: Wear gloves made of sturdy material, like leather, to safeguard your hands from potential injuries.
By following these safety precautions and wearing appropriate protective gear, you can minimize the risk of accidents and injuries while using a framing nailer effectively.
Now that you understand the importance of safety measures, let’s move on to familiarizing yourself with the framing nailer’s components for optimal use without compromising your well-being.
Familiarizing Yourself with the Framing Nailer’s Components
To fully understand the framing nailer’s capabilities, it’s important to familiarize yourself with its various components.
The main component of a framing nailer is the magazine, where you load the nails. Depending on the type of nail you’re using, make sure to select the appropriate size and load them properly into the magazine.
Next, position the nailer on your workpiece in a way that allows you to drive the nail precisely where you want it. Ensure that you have a firm grip on the handle and that your fingers are away from the trigger area.
Once everything is set, pull the trigger to drive the nail into place. It’s crucial to be aware of how powerful these tools can be, especially when working with large nails. Always keep your focus and maintain control over each shot.
Now let’s move on to ensuring proper maintenance and inspection…
Ensuring Proper Maintenance and Inspection
Take a moment to appreciate the reliability and longevity of your framing nailer by properly maintaining and inspecting it. Here are four key steps to ensure its optimal performance:
- Check the piston: Regularly inspect the piston for any signs of wear or damage. Replace it if necessary to avoid potential malfunctions.
- Inspect the air hose: Examine the air hose for any cracks, leaks, or kinks that may impact airflow. Repair or replace it as needed to maintain consistent pressure.
- Clean and lubricate: Keep your framing nailer clean by removing dirt, debris, and sawdust regularly. Apply a few drops of oil to lubricate moving parts for smoother operation.
- Perform safety checks: Before each use, check all safety features such as the trigger lock and depth adjustment mechanism. Ensure they’re functioning properly to prevent accidents.
Now that you know how to maintain your framing nailer properly, let’s move on to selecting the right nails and air pressure for efficient usage in our next section about “selecting the right nails and air pressure”.

Selecting the Right Type of Nail and Air Pressure
When using a framing nailer, it’s important to select the right nails for your specific project. Different types and sizes of nails are available for various applications, such as framing, roofing, or finishing work.
Understanding which nails to use can ensure proper fastening and prevent damage to the materials you’re working with. Additionally, determining the appropriate air pressure for your framing nailer is crucial for safe and effective operation.
Too much pressure can cause the nails to sink too deep into the surface, while too little pressure may result in incomplete penetration. Finding the right balance will help you achieve professional results every time.
What Size Nail Should you Use for Framing? Various Types for Various Projects
Choose the right type and size of nails for your project, ensuring a secure and professional result that will leave you feeling confident in your framing skills. When it comes to framing a house, using a nailer tends to be the most efficient option.
For general framing tasks, such as building walls or decks, 3-1/2 inch nails with a shank diameter of 0.131 inches are commonly used. However, if you’re working on smaller projects like cabinets or trim work, shorter nails around 1-1/4 inches are more appropriate.
It’s crucial to consider the depth at which the nail gun drives the nails into the material; adjust it accordingly for different types of wood and project requirements. Additionally, remember to utilize a sequential trigger for added safety when operating your nail gun.
Now let’s move on to determining the appropriate air pressure for the framing nailer.
Determining the Appropriate Air Pressure for the Framing Nailer
Now that you’re familiar with the different types and sizes of nails for various projects, let’s move on to determining the appropriate air pressure for your framing nailer. This is a crucial step in ensuring the safe and effective use of your tool.
Before you begin, make sure the power source is disconnected to avoid any accidents. Start by attaching the air hose to the nailer’s fitting and adjusting the pressure regulator according to your project requirements.
To test the pressure, depress the safety tip against a scrap piece of wood and pull the trigger. If the nails aren’t driven deep enough or if they go too far into the material, adjust the pressure accordingly until you find the sweet spot. Remember to release the trigger before adjusting anything else.
Now that we’ve covered setting up your framing nailer correctly, let’s move on to operating it smoothly without any issues.
How to Use a Framing Nailer
When operating a framing nailer, it’s important to know how to load nails into the magazine properly.
Make sure you hold and position the framing nailer correctly to ensure safety and accuracy.
When activating the trigger, be mindful of controlling the nailer’s depth of drive for precise results.
Additionally, it’s crucial to use proper handling techniques to minimize recoil and fatigue, ensuring efficiency and comfort while using the tool.
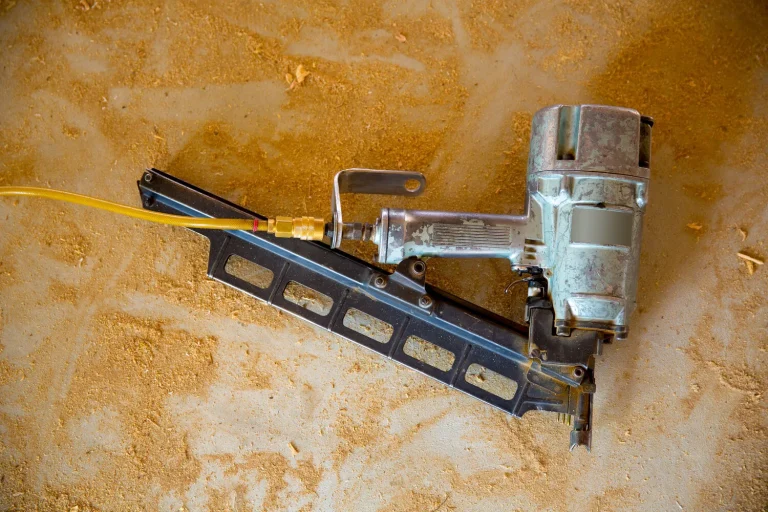
Loading Nails into the Magazine
Start by ensuring that the magazine of your framing nailer is properly loaded with nails before you begin. The magazine is where the nails are stored and fed into the tool for firing.
There are two types of magazines, one designed to hold nails in a line and another that holds nails in a coil. To load nails into the magazine, first, make sure the nailer is disconnected from any power source. Then, slide open the magazine door or latch and insert a strip of nails or a coil into the designated area. Close the door or latch securely to prevent any nails from falling out during operation.
Having your framing nailer loaded with nails is crucial for seamless woodwork. Once your magazine is full, you can pull the trigger to fire one nail at a time until all the nails are used up. When it’s time to reload, follow these same steps again to ensure continuous use of your framing nailer without interruption.
Now that you have successfully loaded your framing nailer with nails, let’s move on to holding and positioning it correctly for safe and effective use.
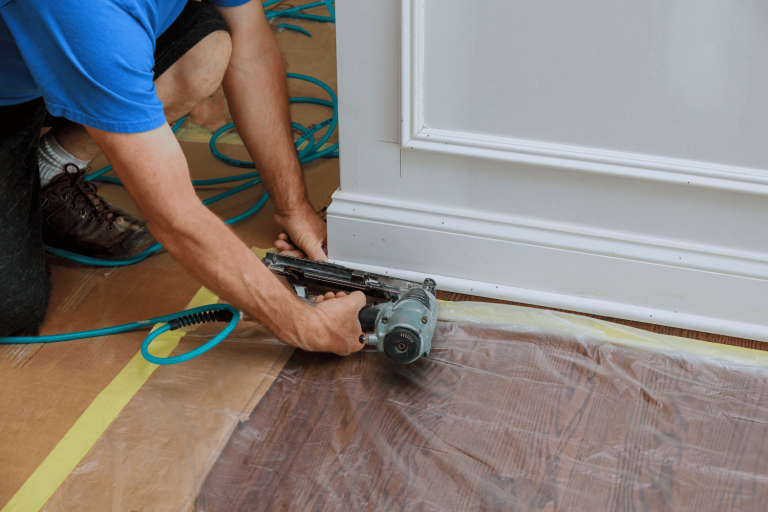
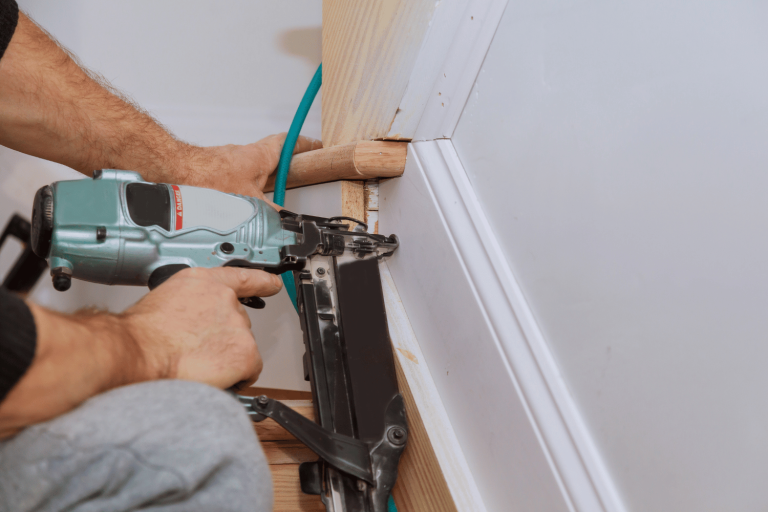
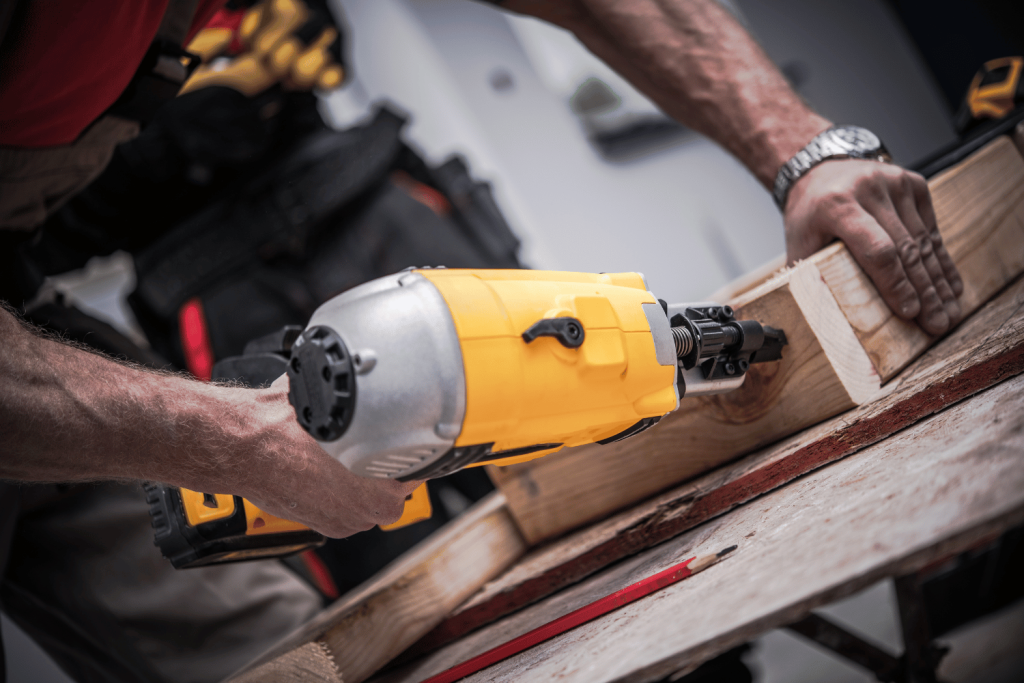
Holding and Positioning the Framing Nail Gun Correctly
Ensure a secure grip on the framing nailer, and position it confidently to unleash your woodworking prowess with precision and control. Holding and positioning the framing nailer correctly is crucial for safe and effective operation. By following these guidelines, you can enhance your performance as a skilled carpenter.
Firstly, hold the nailer firmly with your dominant hand, ensuring that your hand is positioned comfortably on the handle. This will provide stability and control while driving nails into a piece of wood. Keep your fingers away from the trigger area to prevent accidental firing.
Next, position the nailer perpendicular to the surface you are nailing into. This ensures that the nails are driven straight in, preventing any deviation or damage to your workpiece. For toenailing applications, adjust your grip slightly to accommodate for an angled approach.
Lastly, maintain a hands-on approach by keeping both hands on the tool at all times. This allows for better control and reduces the risk of accidents. Remember to always wear appropriate safety gear such as gloves and eye protection.
With proper holding and positioning techniques mastered, you’re now ready to move onto activating the trigger and controlling the nailer’s depth of drive.
Activating the Trigger and Controlling the Nailer’s Depth of Drive
To achieve precise and controlled nailing, confidently activate the trigger and adjust the depth of drive on your framing nailer. Here are some key steps to follow:
- Ensure that there’s enough air in the canister before using the nailer.
- Steadily position the nailer on the surface where you want to fire a nail.
- Engage the trigger mode by firmly pressing it with your finger, while keeping a steady grip on the handle.
- Adjust the depth of drive to control how deep the nail will go into the material.
By mastering these techniques, you’ll have better control over your framing nailer and minimize any risks associated with improper use.
Now let’s move on to discussing proper handling techniques to minimize recoil and fatigue.
Proper Handling Techniques to Minimize Recoil and Fatigue
To transition from the previous subtopic on activating the trigger and controlling the nailer’s depth of drive, let’s now focus on proper handling techniques to minimize recoil and fatigue. When using a framing nailer, it is essential to select the appropriate trigger mode. Most models have two options: sequential and bump fire. Selecting the trigger mode allows you to control when nails are fired. Additionally, make sure you have a spring-loaded depth adjustment feature that enables you to set the desired depth for your fasteners accurately.
To handle the nailer safely, always remember these key points:
- Never point the nailer at anyone or any body part.
- Use essential tools like safety glasses and ear protection.
- Maintain a firm grip on the handle while operating.
- Keep a long hose or extension cord to provide flexibility during work.
By following these methods of fastening with proper handling techniques, you can ensure safer operation and reduce fatigue during extended use. Now let’s explore some nailing techniques and tips in our next section!
Nail Gun Techniques and Tips
When using a framing nailer, it’s crucial to position and align the nailer correctly for accurate placement. Make sure the tip of the nailer is flush with the surface and aligned with the desired nailing spot before pulling the trigger.
Additionally, understanding the difference between sequential and bump firing methods is essential. Sequential firing requires pulling the trigger for each individual nail, providing better control, while bump firing allows for faster nailing by continuously pressing against the work surface.
Finally, mastering common challenges and troubleshooting tips can greatly improve your efficiency. From adjusting air pressure to prevent overdriving nails to clearing jammed nails, knowing how to overcome these obstacles will ensure smooth operation throughout your project.
Positioning and Aligning the Nailer for Accurate Placement
Before you begin using a framing nailer, make sure to position and align it correctly for precise and efficient nail placement. Proper positioning is crucial to ensure that the nail goes exactly where it’s intended to go.
Start by holding the nailer firmly with both hands, placing your dominant hand on the handle and your other hand on the base. Align the tip of the nailer with the desired spot on the surface and keep it perpendicular to the material. Make sure to maintain a firm grip throughout the nailing process to prevent any accidental slips or misfires.
It’s also important to note that building codes may dictate specific requirements for nail placement, so always check those guidelines before starting your project.
Now that you know how to position and align your framing nailer accurately, let’s move on to discussing two different firing methods: sequential and bump firing techniques.
Sequential vs. Bump Firing Methods
The difference between sequential and bump firing techniques lies in their speed and precision. Sequential firing requires the user to depress the safety tip against the surface, pull the trigger, release it, and then repeat for each nail. This method offers more control and accuracy as you can place each nail exactly where you want it. On the other hand, bump firing allows for faster nailing by simply holding down the trigger and bumping the nose of the nailer against the surface. While this method is quicker, it may sacrifice some precision. To choose between these methods, consider your specific needs for speed versus accuracy.
Now that you understand how to choose between sequential and bump firing techniques, let’s move on to overcoming common challenges and troubleshooting tips when using a framing nailer safely and effectively without compromising control.
Overcoming Common Challenges and Troubleshooting Tips
Don’t let common challenges and troubleshooting issues discourage you from mastering the art of using a framing nailer like a pro!
One of the common challenges you may encounter is not being able to consistently line up the nail with your desired target. To overcome this, make sure you hold the nailer firmly against your work surface and take your time to aim properly.
Another challenge could be running out of nails in the middle of a project. To avoid this, always keep an eye on the canister that fits inside your nailer and refill it when necessary. Additionally, if your framing nailer uses compressed air, ensure that you have enough pressure in your compressor for smooth operation.
Lastly, if you’re working in tight spaces, consider using angled or compact framing nailers that require less space. By overcoming these challenges and applying proper troubleshooting techniques, you’ll be well on your way to becoming a framing nailer expert!
Now let’s move on to safety guidelines and best practices for using a framing nailer efficiently.
Safety Guidelines and Best Practices
When it comes to using a framing nailer, safety should always be your top priority. To avoid accidents and injuries, make sure to follow these key tips:
- Always wear appropriate protective gear such as safety glasses and gloves.
- Keep your workspace clean and organized to prevent tripping hazards.
- Never point the nailer towards yourself or others.
Additionally, proper handling and storage of the framing nailer is crucial for both safety and longevity. Always carry the nailer by its handle, never by the trigger or hose, and store it in a secure place away from children or unauthorized users.
Lastly, knowing how to handle jams and perform maintenance safely is essential. Before clearing a jammed nail or performing any maintenance tasks, disconnect the air supply and ensure that the tool is completely depressurized.
Following these guidelines will help you use your framing nailer safely and effectively.
Tips for Avoiding Accidents and Injuries
Stay vigilant and always prioritize your safety when using a nail gun, ensuring that accidents and injuries are avoided at all costs. Here are some tips to help you stay safe while using a framing nailer:
- Wear appropriate safety gear, including safety glasses, ear protection, and gloves.
- Keep the workspace clean and organized to prevent tripping hazards or obstacles.
- Double-check that the nailer is properly connected to the air supply before using it.
- Maintain a firm grip on the nailer and keep your fingers away from the trigger until ready to fire.
- Avoid pointing the nailer towards yourself or others, always directing it away from your body.
By following these guidelines, you can significantly reduce the risk of accidents when using a framing nailer.
Now let’s move on to discussing proper handling and storage of the tool.
Proper Handling and Storage of the Framing Nailer
Properly handling and storing the framing nailer ensures its longevity and prevents potential damage. When using the nailer, always hold it securely with both hands, keeping your fingers away from the trigger. This will help you maintain control and prevent accidental firing.
After each use, make sure to clean off any dirt or debris from the nailer to keep it in good working condition. When you’re done using the tool, store it in a dry and secure location where it won’t be exposed to moisture or extreme temperatures. This will protect it from rusting or becoming damaged.
By following these guidelines for handling and storage, you can ensure that your framing nailer stays in great shape for years to come.
To continue maintaining control over your framing nailer, it’s important to learn how to handle jams and perform maintenance safely.
Handling Jams and Performing Maintenance Safely
To effectively handle jams and safely perform maintenance on your framing nailer, it’s crucial to familiarize yourself with proper troubleshooting techniques and routine care. When it comes to dealing with jams, follow these steps:
- Turn off the nailer: Before attempting any troubleshooting or maintenance, always switch off the power source and disconnect the air supply to prevent accidental firing.
- Clear the jammed nail: Use a screwdriver or Allen wrench to carefully remove any stuck nails from the magazine or nose of the nailer.
- Inspect for damage: Check for bent or damaged nails, as well as any signs of wear on the driver blade or piston assembly. Replace any worn or damaged parts immediately.
- Clean thoroughly: Regularly clean dust and debris from the nailer using compressed air or a brush. This helps maintain optimal performance and prevents jams.
Remember to consult your framing nailer’s manual for specific instructions on troubleshooting and maintenance procedures. By practicing good maintenance habits, you can ensure that your framing nailer operates safely and efficiently every time you use it.
Frequently Asked Questions
Can a framing nailer be used for other types of projects besides framing?
Yes, a framing nailer can be used for other types of projects besides framing. It is versatile and can be used for tasks such as building fences, installing subflooring, or constructing decks.
What are some common mistakes to avoid when operating a framing nailer?
To avoid common mistakes when operating a framing nailer, make sure to keep your hands clear of the firing area, never point the nailer at yourself or others, use proper safety gear, regularly inspect and maintain the tool, and follow all instructions provided by the manufacturer.
How do I properly maintain and clean a framing nailer?
To properly maintain and clean a framing nailer, start by disconnecting it from the power source. Remove any nails or debris, then lubricate the moving parts with oil. Clean the air filter regularly and inspect for any damage. Store it in a dry place to prevent rust.
Can a framing nailer be used on different types of materials, such as concrete or metal?
Yes, a framing nailer can be used on different types of materials such as concrete or metal. However, it is important to use the appropriate nails and attachments for each specific material to ensure proper and safe usage.
Are there any specific safety precautions to take when using a framing nailer on a ladder or scaffolding?
When using a framing nailer on a ladder or scaffolding, it is crucial to take specific safety precautions. Make sure the ladder or scaffolding is stable and secure, wear proper fall protection gear, and be mindful of your surroundings to avoid accidents.
Final Thoughts
Mastering the safe and effective use of a framing nailer requires careful understanding and preparation. By selecting the right nails and air pressure, operating the tool correctly, and employing proper nailing techniques, you can ensure successful results in your construction projects.
Additionally, following safety guidelines and best practices is crucial to prevent accidents and injuries. Remember to always prioritize safety by wearing protective gear such as goggles and gloves, keeping a firm grip on the tool, and being aware of your surroundings.
With practice and adherence to these principles, you’ll be able to confidently handle a framing nailer like a pro.