
How to Use an Orbital Sander for Flawless Finishes
Welcome, fellow woodworking enthusiasts, to our guide on how to use an orbital sander! Whether you’re a seasoned DIYer or just starting out on your woodworking journey, mastering the art of using this versatile power tool will undoubtedly elevate your projects to new heights of craftsmanship.
The orbital disc sander, a true workhorse in the world of woodworking, is a tool you’ll come to rely on time and time again. Its ability to smooth surfaces, remove imperfections, and prepare wood for finishing makes it an invaluable companion in your workshop. However, like any power tool, understanding how to use it safely and effectively is paramount to ensure both the quality of your work and your own well-being.
In this article, we’ll take you on a step-by-step journey to unlock the full potential of your orbital sander. From grasping the basics to mastering advanced techniques, we’ve got you covered. But before we dive into the nitty-gritty of sanding wizardry, let’s emphasize the importance of safety. Remember, a happy woodworking experience is a safe woodworking experience.
So, fasten your safety goggles, dust off your workbench, and let’s embark on this orbital sanding adventure together! By the end of this guide, you’ll be confidently wielding your orbital sander like a pro, leaving behind nothing but smooth surfaces and awe-inspiring woodwork.
Getting to Know Your Random Orbital Sander
Ah, the trusty orbital sander – your key to achieving smooth, flawless finishes on your woodworking projects. Before we delve into the sanding magic, let’s get acquainted with the different parts of this versatile tool. Knowing each component’s role will empower you to make the most out of your orbital sander and take your woodworking game to new heights!
Familiarizing Yourself with the Different Parts
- Sanding Pad: At the heart of your orbital sander is the sanding pad, sometimes referred to as the sanding disc. This flat, circular surface is where you attach the sandpaper. Depending on the model, you might find various sizes of sanding pads, each catering to different sanding needs.
- Dust Collection System: Say goodbye to the days of messy workshops! The dust collection system helps keep sawdust and debris at bay while you work, ensuring a cleaner and healthier workspace. Some orbital sanders come equipped with a built-in dust bag, while others have attachments for connecting to a dust extractor.
- On/Off Switch: As self-explanatory as it sounds, the on/off switch is your control center. Before you begin sanding, double-check that it’s in the off position. Safety first!
- Speed Control Dial: Many orbital sanders offer adjustable speed settings to match different materials and sanding tasks. This feature grants you more precision and control, especially when dealing with delicate surfaces.
- Handle/Grip: The handle or grip (usually located at the top) provides a comfortable place to hold the sander while you work. A good grip ensures stability and reduces hand fatigue during prolonged sanding sessions.
- Trigger or Lock-On Button: The trigger is what you press to start the sander. Some models also have a lock-on button, which allows you to keep the sander running without continuously holding down the trigger. This feature is convenient for extended sanding sessions.
Mastering the Handle and Grip
Properly handling your power sander is crucial for achieving optimal results. Here are some handy tips on holding the sander like a seasoned pro:
- Two-Handed Grip: For better control, use a two-handed grip with one hand on the main handle and the other on the front grip (if available). This stabilizes the sander and reduces vibration, making your sanding more efficient.
- Minimal Pressure: Avoid pressing down too hard on the sander. Instead, let the sander’s weight and motion do the work. Excessive pressure can lead to uneven sanding and premature wear on the sandpaper.
- Steady Movement: Move the sander in a steady and consistent back-and-forth or side-to-side motion, depending on the shape of your workpiece. Keep the sander level to prevent dips or gouges in the wood surface.
Now that we’re familiar with the orbital sander’s anatomy, purpose, and proper grip, we’re ready to roll up our sleeves and dive into the world of orbital sander uses.
Selecting the Right Sandpaper
Ah, sandpaper – the unsung hero of the woodworking world! When it comes to achieving that silky smooth finish, choosing the right sandpaper is an art in itself. Let’s dive into the world of sandpaper grit, types, and the know-how to keep your orbital sander running with fresh, efficient sandpaper.
Importance of Choosing the Appropriate Grit
Imagine trying to smooth out a rough wooden surface with ultra-fine sandpaper or attempting to strip away paint with coarse sandpaper. Not an ideal situation, right? That’s why understanding sandpaper grit and its importance is essential for woodworking success.
- Grit Defined: Sandpaper grit refers to the number of abrasive particles per square inch of sandpaper. The higher the grit number, the finer the particles, and vice versa. Lower grits have larger particles for aggressive material removal, while higher grits excel at fine finishing.
- Different Strokes for Different Folks: The appropriate grit depends on your specific task. For heavy material removal, like leveling or removing paint or varnish, opt for lower grits (around 40 to 80). For smoothing out rough surfaces and preparing for finishing, medium grits (around 100 to 150) are your best bet. Lastly, for that flawless, velvety finish, turn to higher grits (above 180) for the ultimate finesse.
- Gradual Progression: In most cases, it’s best to start with a lower grit and work your way up to higher grits progressively. This ensures a smoother transition between sanding stages and minimizes the risk of unsightly scratches.
Various Types of Sandpaper and Their Recommended Uses
Sandpaper isn’t a one-size-fits-all deal – it comes in various types, each tailored to specific tasks. Understanding the differences will help you choose the perfect match for your woodworking endeavors.
- Aluminum Oxide: The workhorse of sandpaper, aluminum oxide is versatile and suitable for general woodworking tasks. It’s long-lasting, ideal for both bare wood and painted surfaces, and available in various grits.
- Garnet: Best known for its fine finish capabilities, garnet sandpaper shines when used for fine sanding and finishing applications. It works wonderfully on softer woods and is a go-to choice for woodworkers seeking a polished result.
- Silicon Carbide: This sandpaper type is more specialized, excelling in sanding metal and plastic surfaces. It’s also an excellent choice for wet sanding applications.
- Zirconia Alumina: If you’re dealing with tougher materials like metal or fiberglass, zirconia alumina sandpaper is your champion. It’s highly durable and aggressive for heavy-duty sanding tasks.
- Ceramic Alumina: Similar to zirconia alumina, ceramic alumina sandpaper is perfect for challenging materials and extended use, offering exceptional longevity.
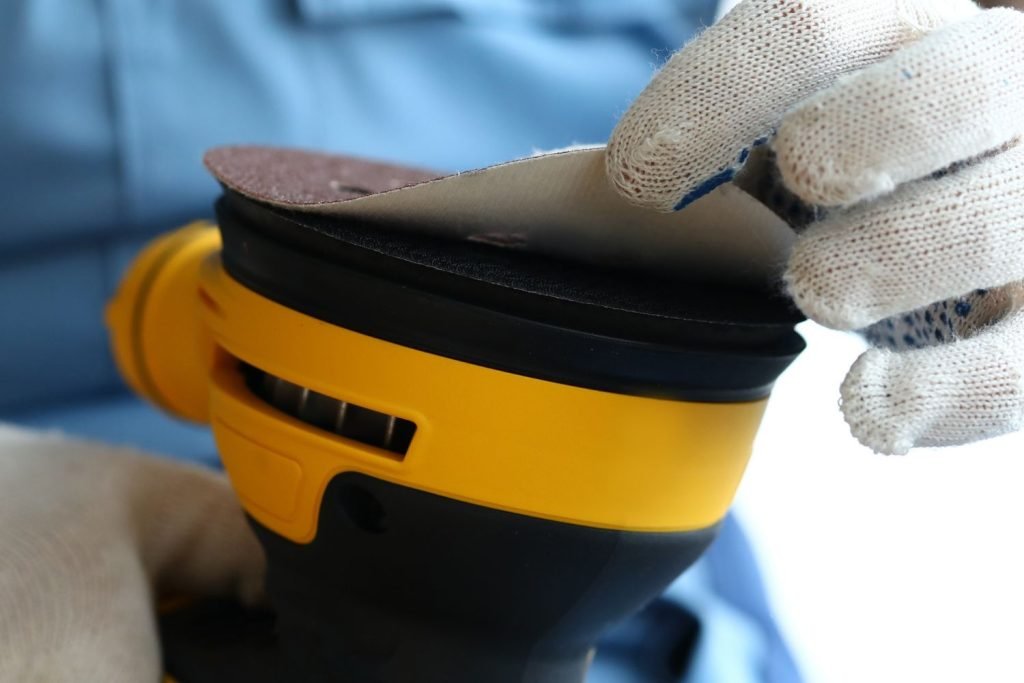
Attaching and Replacing Sandpaper on Your Random Orbit Sander
Now that you’ve chosen the perfect sandpaper for your task, it’s time to get down to business and get it ready on your orbital sander. Follow these simple steps for a seamless setup:
- Power Down: Before attaching or replacing sandpaper, ensure your orbital sander is turned off and unplugged for safety.
- Remove the Old Sandpaper: If you’re replacing sandpaper, peel off the old sheet from the sanding pad carefully.
- Align the New Sandpaper: Line up the holes on the sandpaper with those on the sanding pad, ensuring a precise fit. Most sandpaper comes with pre-punched holes that match most orbital sanders.
- Secure the Sandpaper: Press the sandpaper firmly onto the sanding pad, ensuring it’s flat and taut. Some orbital sanders have a clamp or hook-and-loop system for extra grip.
- Trim Excess Sandpaper: If needed, trim any excess sandpaper around the edges to avoid interference during sanding.
Now that you’re armed with the knowledge of sandpaper grit, types, and how to attach it to your orbital sander, you’re ready to take on any sanding challenge that comes your way.

Step-by-Step Guide to Use a Random Orbital Sander
Ready to unleash the full sanding potential of your orbital sander? This step-by-step guide will take you from preparation to that perfect finish, ensuring your woodworking projects shine with finesse. So, let’s roll up our sleeves and dive right in!
Prepare the Workpiece and the Workspace
Before you start sanding, take a moment to prepare both your workpiece and the surrounding workspace:
- Clear the Area: Ensure your workspace is free of clutter, providing ample room for maneuvering the orbital sander.
- Secure the Workpiece: Fasten or clamp down your workpiece to prevent it from shifting or moving during sanding. This ensures stability and consistent results.
- Surface Inspection: Check the workpiece for any nails, staples, or other protruding objects that could damage the sandpaper or cause accidents. Smooth out any rough edges if necessary.
Power On and Test the Orbital Sander
Now that your work area is ready, let’s power up the orbital sander:
- Plug It In: Connect the orbital sander to a suitable power source. Ensure the power cord is away from the sanding path to avoid any accidents.
- Perform a Test Run: Before touching the workpiece, switch on the sander and let it run for a few seconds. This allows you to check for any abnormalities or vibrations that may indicate an issue with the tool.
Master the Correct Sanding Technique and Motion
The key to achieving that smooth, flawless finish lies in your sanding technique and motion. Follow these guidelines for optimal results:
- Grip with Confidence: Hold the orbital sander with a firm yet comfortable grip. Utilize both hands for stability, placing one hand on the main handle and the other on the front grip (if available).
- Start Slowly: Begin sanding with gentle pressure and gradually increase as needed. Remember, it’s better to start with less pressure and adjust accordingly, rather than applying too much force right away.
- Back-and-Forth or Side-to-Side: Move the sander in a steady back-and-forth or side-to-side motion, depending on the shape and size of your workpiece. Keep the sander moving and level to avoid uneven sanding or dips.
- Overlapping Passes: Ensure each sanding pass overlaps the previous one by approximately one-third of the sanding pad’s width. This helps to achieve an even and consistent finish across the entire surface and avoid swirl marks.
Tips for a Smooth and Even Finish
To achieve that coveted smooth and even finish, consider the following tips:
- Gradual Progression: Start with a coarser grit sandpaper to remove any roughness or imperfections. Then, work your way up to finer grits for a progressively smoother surface.
- Sand in Stages: If your workpiece requires extensive sanding, break it down into stages. Gradually switch to finer grits to achieve a refined finish without skipping too many grits in one go.
- Keep it Cool: Avoid overheating the wood by using gentle, continuous sanding motions. Applying excessive pressure or leaving the sander in one spot for too long can cause heat buildup, potentially damaging the wood surface.
Let the Sander Do the Work, Avoid Excessive Pressure
One common mistake is applying excessive pressure while sanding. Remember, your orbital sander is designed to do the work for you:
- Be Gentle: Let the weight of the sander and its random orbital motion do the heavy lifting. Avoid pushing down too hard, as it can lead to uneven sanding and premature wear on the sandpaper.
- Allow Time for Results: Be patient and let the sander work its magic. Resist the temptation to rush through the sanding process. Give the sander sufficient time to achieve a smooth and even finish.
By following these step-by-step instructions and implementing these useful tips, you’ll master the art of using an orbital sander like a true woodworking aficionado.
Handling Difficult Areas and Sanding Challenges
Ah, the joys of woodworking – but what about those tricky nooks and crannies that seem to elude your orbital sander? Fret not! In this section, we’ll tackle the sanding challenges head-on, offering solutions to conquer corners, edges, tight spaces, and even those stubborn surfaces. Let’s turn these challenges into opportunities for flawless woodworking!
Sanding Corners, Edges, and Tight Spaces Effectively
Sanding those hard-to-reach areas can be daunting, but with the right approach, you’ll breeze through it like a pro:
- Utilize a Detail Sander: For intricate corners and tight spaces, consider using a detail sander (also known as a mouse sander). Its compact size and pointed tip allow you to navigate with ease, reaching places that a larger orbital sander couldn’t.
- Embrace Hand Sanding: When dealing with delicate edges or unusually shaped surfaces, hand sanding becomes your trusty ally. Wrap sandpaper around a small block of wood or use sanding sponges to retain control and achieve precision.
- Tackle Corners with Care: To sand inside corners, fold a small piece of sandpaper and gently work it into the corner. Be mindful of your hand placement to avoid accidentally bumping the surrounding areas.
- Custom Sanding Solutions: For uniquely shaped pieces or odd angles, get creative! Create custom sanding blocks by wrapping sandpaper around appropriately shaped objects like dowels or wooden blocks.
Dealing with Uneven Surfaces and Removing Stubborn Material
Encountering uneven surfaces or materials that seem determined to stay put? Fear not – these strategies will come to your rescue:
- Assess the Surface: Before diving in, assess the uneven surface and identify the high spots. Use a pencil to mark these areas for targeted sanding.
- Employ Gradual Pressure: Apply more pressure on the high spots while keeping a lighter touch on the surrounding areas. This technique helps level out the surface over time, ensuring a smooth finish.
- Change Grits Strategically: For stubborn materials or irregular surfaces, you may need to switch between sandpaper grits more frequently. Start with a coarser grit to tackle tough spots and transition to finer grits for finishing touches.
- Wet Sanding for Resistant Surfaces: For particularly stubborn materials like paint or varnish, wet sanding can be a game-changer. Soak the sandpaper in water, then apply it to the surface. The water helps lubricate the sandpaper, allowing for smoother material removal.
- Heat Gun or Chemical Stripping: In extreme cases, when the material is extremely stubborn or adhered to the surface, consider using a heat gun to soften it, followed by gentle scraping or sanding. Alternatively, chemical paint strippers can help with paint or finish removal.
Remember, handling difficult areas and sanding challenges requires patience and attention to detail. Take your time, use the right techniques, and adapt to the situation at hand. With practice, you’ll become a master at turning those tough spots into seamless works of woodworking art.
By conquering these sanding challenges, you’re well on your way to becoming a seasoned orbital sander maestro. So, embrace these solutions, equip yourself with determination, and let your orbital sander work its magic, transforming every woodworking project into a thing of beauty.
Final Thoughts
Fellow woodworking enthusiasts, it’s time to put your newfound knowledge into action. Grab your orbital sander, select the perfect sandpaper, and let your creativity flow as you breathe life into your projects.
Always remember, practice makes perfect. Don’t be afraid to experiment with different techniques and materials. Each project you undertake is an opportunity to refine your skills and grow as a woodworker.
From now on, may your woodworking journey be filled with confidence, creativity, and the joy of watching your projects blossom under the gentle touch of your orbital sander.