How To Use a Track Saw for Perfectly Straight Cuts
A track saw is a powerful and versatile tool that can greatly enhance your woodworking projects. Whether you’re a professional carpenter or a DIY enthusiast, understanding how to use a track saw can take your craftsmanship to the next level. In this article, we’ll walk you through the basics of using a track saw and explore its numerous benefits and applications.
A track saw, also known as a plunge-cut saw or a rail saw, is a portable cutting tool designed to make straight and precise cuts in various materials such as wood, plywood, and even certain metals. What makes a track saw more than just a circular saw is its integrated guide track or rail, which ensures exceptional accuracy and stability during cutting.
Using a track saw offers a range of benefits that make it a popular choice among woodworkers. First and foremost, it allows you to achieve remarkably straight cuts with minimal effort. The guide track eliminates the need for measuring, marking, and clamping, providing a foolproof system for flawless cuts. Moreover, the plunge-cut feature of a track saw allows you to start a cut in the middle of a workpiece, enabling you to create intricate designs and precise interior cuts.
Another advantage of using a track saw is its portability. Unlike table saws or panel saws, track saws are lightweight and easy to transport, making them ideal for job site work or projects that require maneuverability. With a track saw, you can bring the tool to the workpiece rather than the other way around, saving you time and effort.
In addition to these benefits, a track saw offers remarkable versatility. It can handle a wide range of cutting tasks, including crosscuts, rip cuts, bevel cuts, and even plunge cuts. Whether you’re building cabinets, installing flooring, or crafting custom furniture, a track saw can be a game-changer in terms of precision and efficiency.
Now that we’ve established what a track saw is and the advantages it offers, let’s dive into the details of how to use this remarkable tool.
Understanding the Track Saw
Basic Components of a Track Saw
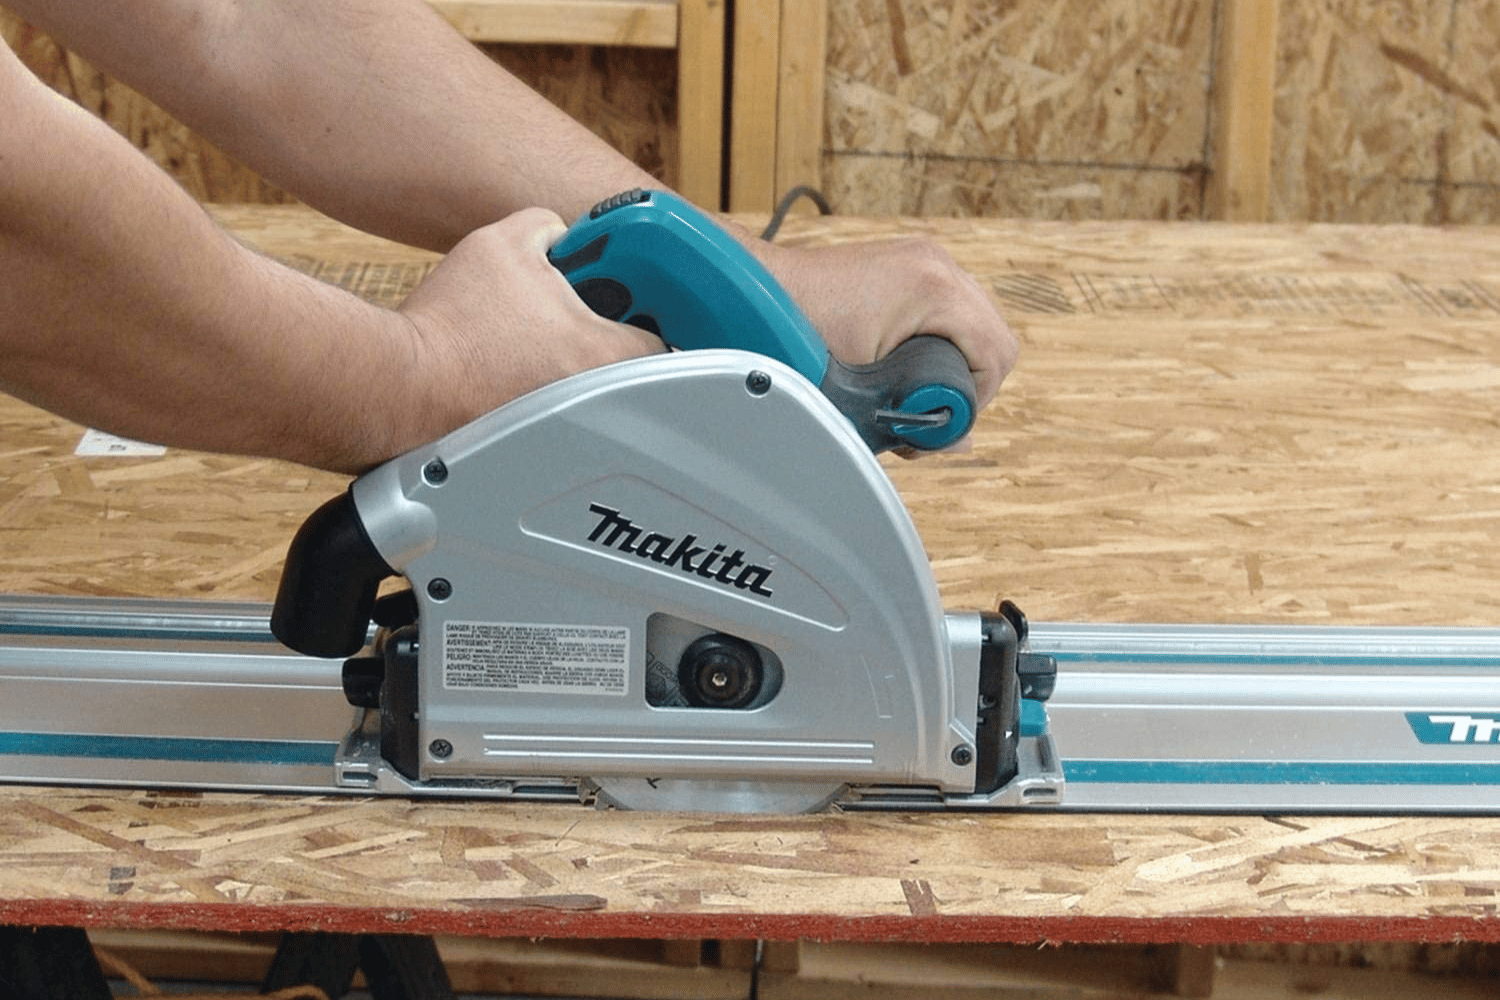
To effectively use a track saw, it’s important to familiarize yourself with its key components. A typical track saw consists of three main parts: the saw itself, the guide track or rail, and the clamps. The saw is designed to smoothly glide along the track, guided by the precision-machined groove on the bottom of the saw base. The guide track is a long, straight aluminum or steel rail that serves as a guide for the saw, ensuring straight and accurate cuts. Lastly, the clamps are used to secure the guide track to the workpiece, providing stability and preventing any movement during cutting.
Importance of the Track and its Role in Achieving Precise Cuts
The track or guide rail is the heart of a track saw and plays a crucial role in achieving precise and straight cuts. The saw base fits snugly into the groove on the track, allowing the saw to move in a straight line along the predetermined path. This eliminates the need for manual guiding or relying on a separate straightedge, resulting in clean, accurate cuts. The track also acts as a barrier, preventing the saw from wandering off course and ensuring consistent cuts, even when working with large or heavy materials.
Types of Blades Used with Track Saws
Different cutting tasks require different types of blades. Most track saws use a carbide-tipped circular saw blade that is specifically designed for clean and precise cuts. These blades feature sharp teeth that can effortlessly slice through various materials without tearing or splintering. When choosing a blade for your track saw, consider factors such as the type of material you’ll be cutting (wood, plywood, laminate, etc.), the desired finish, and the blade’s tooth count. Blades with a higher tooth count are better suited for fine and smooth cuts, while blades with fewer teeth are ideal for faster, rougher cuts.
It’s worth noting that some track saws have interchangeable blades, allowing you to switch between different blades to accommodate different cutting tasks. This flexibility enhances the versatility of the track saw and expands its capabilities for various projects.
Understanding these basic components of a track saw, along with the importance of the guide track and the appropriate selection of blades, sets the foundation for using this tool effectively.
Setting Up a Track Saw
Choosing the Appropriate Track Length for the Job
When setting up your track saw, it’s crucial to choose the appropriate track length for the task at hand. Most track saws offer a variety of track lengths to accommodate different cutting requirements. If you’re working with large sheets of plywood or other long materials, a longer track will provide the necessary support for straight cuts across the entire length. For smaller projects or when making shorter cuts, a shorter track may be more convenient and easier to maneuver.
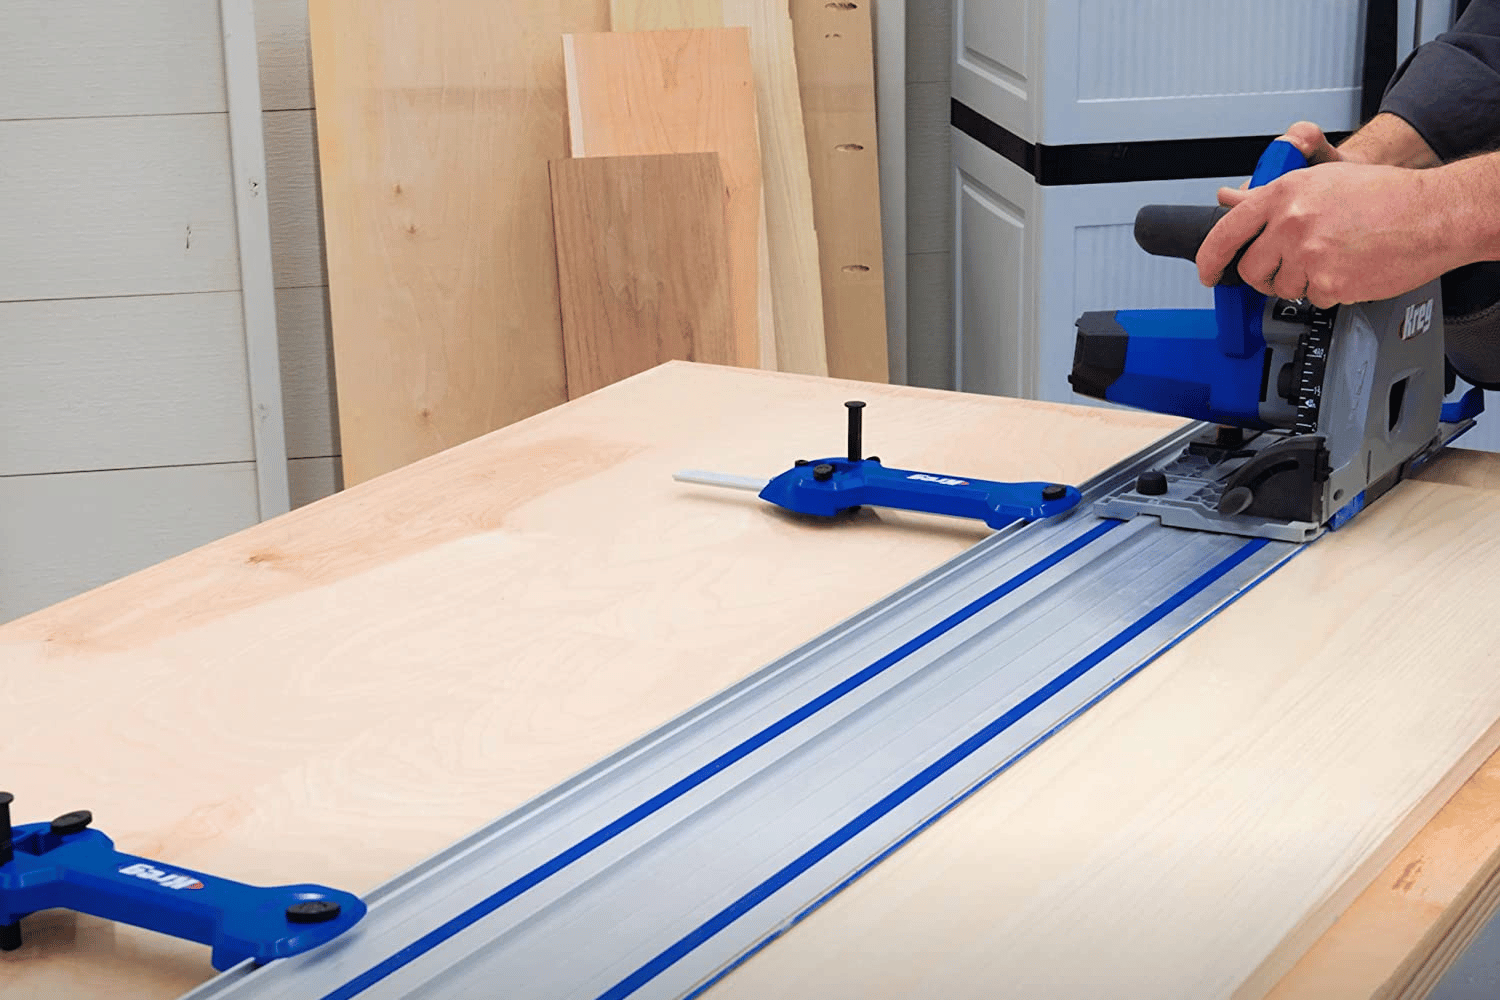
Properly Aligning and Securing the Track to the Workpiece
To ensure accurate cuts, it’s important to align and secure the track properly. Start by placing the track on the workpiece, making sure it is straight and aligned with the desired cutting line. Use clamps to secure the track in place, ensuring it doesn’t shift during cutting. The clamps should be positioned in a way that allows the saw to glide smoothly along the track without any interference.
Pay attention to the position of the track edge relative to the cutting line. The edge of the saw’s base should align with the cutting line, ensuring the blade will make the desired cut. Take your time to double-check the alignment before proceeding to the next step.
Adjusting the Track Saw for the Desired Cutting Depth and Angle
Before making any cuts, it’s essential to adjust the track saw for the desired cutting depth and angle. Most track saws have adjustable cutting depth settings, allowing you to control the depth of the blade’s penetration into the material. Adjust the cutting depth based on the thickness of the workpiece and the depth required for the cut. Keep in mind that it’s generally recommended to set the cutting depth slightly deeper than the material’s thickness to ensure a clean cut.
For angled cuts, track saws usually have an adjustable bevel feature. By loosening the bevel lock and adjusting the base’s angle, you can achieve beveled cuts at different angles. Ensure that the bevel lock is securely tightened once you’ve set the desired angle.
Once you have chosen the appropriate cutting depth and angle, you’re ready to make precise and controlled cuts using your track saw.

Making Accurate Cuts with a Track Saw
Techniques for Making Straight Cuts Along the Track
One of the key advantages of using a track saw is the ability to make incredibly straight cuts. To ensure accuracy, follow these techniques:
- Position the track saw: Start by placing the saw at the beginning of the cut, ensuring that the blade is not touching the material. Align the blade with the cutting line, making sure the edge of the saw’s base is flush with the edge of the track.
- Start the saw and plunge into the material: With the saw aligned, turn it on and gently plunge the blade into the material. Allow the blade to reach full speed before advancing along the track.
- Maintain a steady and controlled motion: As you move the saw along the track, maintain a consistent speed and exert a gentle forward pressure. Let the saw and the track do the work for you; there’s no need to force the cut.
- Focus on the cutting line: Keep your eyes on the cutting line, rather than the blade. This helps ensure that you stay on track and make accurate cuts. Trust the guide track to keep the saw on course.
Tips for Achieving Precise Angled Cuts
Making precise angled cuts with a track saw requires attention to detail. Here are some tips to help you achieve accurate angles:
- Set the bevel angle: Adjust the bevel angle of the track saw’s base to the desired angle for the cut. Make sure the bevel lock is securely tightened to maintain the angle during cutting.
- Practice on scrap material: If you’re new to making angled cuts, it’s a good idea to practice on scrap material first. This allows you to familiarize yourself with the saw’s movement and the effect of the bevel angle on the cut.
- Use a protractor or angle guide: For precise angles, consider using a protractor or angle guide to set the bevel angle. This ensures consistency and accuracy across multiple cuts.
- Take your time: Angled cuts require more precision, so take your time and make deliberate, controlled movements. Don’t rush the process, as it can lead to inaccurate cuts.
How to Cut Along the Edge of a Workpiece for Trimming or Fitting Purposes
When it comes to trimming or fitting pieces together, cutting along the edge of a workpiece is often necessary. Follow these steps for accurate edge cuts:
- Align the track with the edge: Place the track parallel to the edge of the workpiece, aligning it with the desired cutting line. Secure the track using clamps to prevent any movement during cutting.
- Position the saw: Position the track saw at the beginning of the cut, with the blade slightly away from the edge. Ensure that the blade is aligned with the cutting line and the edge of the saw’s base is flush with the track.
- Start the saw and make the cut: Turn on the saw and gently plunge the blade into the material. Move the saw along the track, maintaining a steady and controlled motion. Keep the edge of the base in contact with the track throughout the cut.
By following these techniques for straight cuts, tips for angled cuts, and steps for cutting along the edge of a workpiece, you’ll be able to achieve precise and accurate cuts with your track saw. In the next section, we’ll explore advanced techniques and applications of the track saw to further expand your woodworking capabilities.

Advanced Techniques and Applications
Creating Dados and Grooves Using a Track Saw
One of the advanced techniques you can accomplish with a track saw is creating dados and grooves. These are useful for joinery, shelving systems, and other woodworking applications. Here’s how you can do it:
- Set up the track: Align the track parallel to the desired location of the dado or groove. Secure it firmly in place using clamps.
- Adjust the cutting depth: Determine the depth of the dado or groove you want to create and adjust the cutting depth of the track saw accordingly. It’s recommended to make multiple passes, gradually increasing the cutting depth with each pass, for cleaner results.
- Make the initial cut: Position the saw at the beginning of the dado or groove and make the initial cut. Keep the edge of the saw’s base aligned with the edge of the track to ensure accuracy.
- Repeat the cuts: Move the saw along the track, making subsequent passes until the full length of the dado or groove is completed. Take your time and maintain a steady motion to achieve consistent and precise cuts.
Making Plunge Cuts for Interior Openings
Another advanced technique you can master with a track saw is making plunge cuts. Plunge cuts are ideal for creating interior cuts or openings in the middle of a workpiece. Here’s how to do it:
- Set the cutting depth: Determine the desired cutting depth for the plunge cut and adjust the track saw accordingly. Remember to set the cutting depth slightly deeper than the material’s thickness to ensure a clean cut.
- Position the saw: Place the saw at the location where you want to make the plunge cut. Ensure that the blade is not touching the material yet.
- Start the saw and plunge: Turn on the saw and gently plunge the blade into the material. Allow the blade to reach full speed before advancing further into the cut.
- Make the cut: With the blade fully plunged, move the saw in a controlled and steady motion along the desired cutting line. Continue until you reach the desired depth or complete the cut.
Overview of Other Creative Applications of Track Saws
Beyond straight cuts, angled cuts, dados, and plunge cuts, track saws offer a range of other creative applications. Here are a few examples:
- Ripping narrow strips: By using the track saw parallel to the edge of the material, you can accurately rip narrow strips of wood or plywood.
- Trimming doors or panels: Track saws excel at trimming doors or panels to fit precisely within a frame or opening. The straight cuts and controlled motion ensure a clean and accurate result.
- Bevel cuts and compound angles: With the bevel feature of a track saw, you can achieve bevel cuts at various angles, allowing for more intricate designs and precise joinery.
- Cutting curves: While track saws are primarily known for straight cuts, you can use them to make gentle curves by carefully guiding the saw along the desired curve.
Remember to always practice these advanced techniques on scrap material first to become comfortable and confident before applying them to your actual projects.
By exploring these advanced techniques and applications, you can unlock the full potential of your track saw and elevate your woodworking skills to new heights.
Final Thoughts
In this article, we have covered the fundamentals of using a track saw and explored various aspects to help you master this versatile tool.
As you can see, a track saw is a remarkable tool that offers versatility, precision, and ease of use in a wide range of woodworking projects. Whether you’re a seasoned woodworker or a beginner, the track saw can become a valuable addition to your workshop.
We encourage you to embrace the versatility of the track saw and continue exploring its capabilities. With practice and experience, you’ll become more proficient in using this tool, allowing you to tackle more complex projects and achieve exceptional results.
So, grab your track saw, select the right track length, align it accurately, adjust the cutting depth and angle, and start making precise cuts with confidence. Let your creativity flow and discover the endless possibilities that a track saw offers.