Why Hammer Drill Bits Are Perfect for Tile Removal
It’s often believed that a poor craftsman blames their tools, but the truth is, having the right tools can make a huge difference. This is especially true when you’re trying to remove stubborn tiles. The right tool for this job is a hammer drill bit, which provides a powerful and precise solution for tile removal. Why are hammer drill bits so effective? They combine a hammering action with rotary drilling to efficiently break through tough materials like tile. This means you can get the job done faster and with less effort.
When using a hammer drill bit, the bit literally hammers into the tile while it rotates, breaking up the tile and mortar much more effectively than a standard drill bit. It’s like having a mini jackhammer at your fingertips. This is particularly useful in situations where the tiles are firmly glued down or when you’re working with porcelain or ceramic tiles that are hard to crack.
When choosing a hammer drill bit, look for one that’s specifically designed for tile removal. Brands like Bosch and DeWalt offer bits that are optimized for this task. These specialized bits help prevent damage to the underlying surface, which is crucial if you’re looking to preserve the integrity of the area you’re working on.
By using a hammer drill bit, you can tackle tile removal with confidence, knowing that you’re using a tool that’s up to the task. It’s a great example of how the right equipment can simplify a complex project. So, the next time you’re faced with a renovation project that includes tile removal, remember to opt for a hammer drill bit and watch how much easier the process becomes.
Understanding Hammer Drill Functions
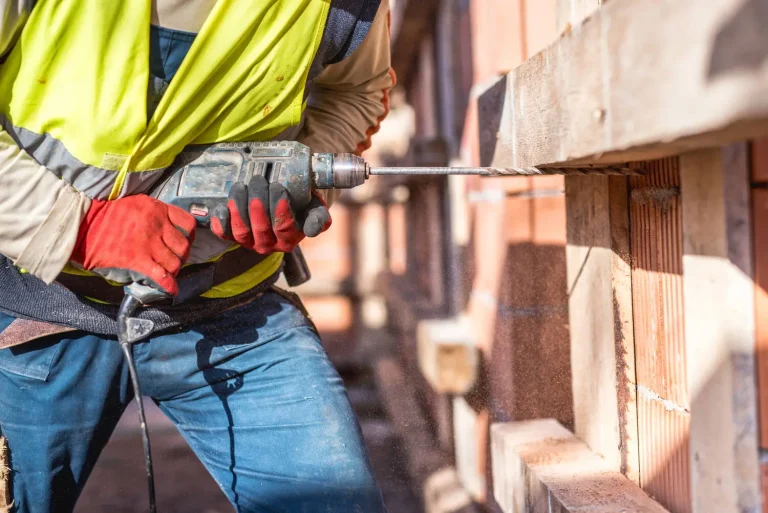
When you need to take out tiles, knowing how to use a hammer drill is important. This tool works by spinning and hitting at the same time, which helps it break through tough materials like tile. Think of it as a normal drill that also punches into the tile to break it apart. Make sure to use the right drill bit, usually one for masonry, because it’s made to handle the hitting and stay sharp while you work.
To avoid drilling too deep and damaging what’s underneath, set the drill’s clutch to a lower level. You should press down steadily and at the right angle to chip the tile away without overworking the drill or wearing out the bit.
If you’re using an SDS Plus hammer drill, you’d pick an SDS Plus masonry bit for the job. Start on a low setting and apply gentle pressure. As you work, keep the drill at about a 45-degree angle to the tile surface. This angle helps the bit to slide under the tiles and lift them off more effectively. Remember, the goal is to remove the tiles with precision, not to force your way through them.
The Renovation Role of Tile Removal
Tile removal is an essential part of remodeling because it allows for the installation of new floors and gives your space a fresh look. To prepare for this job, it’s important to work with precision and be thorough. Using a hammer drill with the correct attachment can help you take off tiles quickly and without harming the surface underneath.
- Choosing the Right Attachment: Pick a chisel or spade attachment that’s made for taking off tiles.
- Proper Angle: Use the tool at the right angle to lift the tiles easily without too much force.
- Steady Method: Keep a firm, even pressure and move smoothly to avoid hurting the surface below.
- Watch the Depth: Keep an eye on how deep the attachment goes to avoid going too far.
By focusing on these details, you can make your remodeling work go more smoothly and achieve a better-looking result.
When selecting a bit, look for a ’tile chisel’ specifically designed for such tasks. A good angle might be around 30 degrees from the floor, which helps in popping the tiles off rather than shattering them. Moving the drill in a consistent pattern, perhaps in straight lines or following the tile edges, can prevent unevenness on the surface below. It’s crucial not to push the bit too deep—it should just slide under the tile.
Opting for Hammer Drill Bits
Understanding the importance of the correct tools for tile removal is key for a successful home renovation. Hammer drill bits are essential because they’re made to break through tough materials like tile. They do this by rapidly hitting the tile, breaking it up, and the spinning action helps to remove the broken pieces.
When picking out a hammer drill bit, it’s important to look at what it’s made of. Bits with carbide tips are usually the best because they last longer. Also, choose a bit that’s the right size for the job. If you’re taking out grout, a smaller bit works well, but for bigger pieces of tile, a larger bit is more effective.
If you’re working on removing standard 4-inch ceramic tiles, a 1/4-inch carbide-tipped bit is a good choice for the grout lines, while a 2-inch wide spade bit might be better for lifting the tiles themselves.
Always remember to wear safety gear when using these tools.
Types of Drill Bits for Tiles
When drilling into tiles, it’s crucial to pick the right drill bit to do the job well and avoid damage. Here’s how to choose:
- Carbide-Tipped Drill Bits: These are great for making clean holes in tough tiles. They’re strong and don’t cause the tile to crack.
- Diamond Drill Bits: These bits are the top choice for very hard tiles or stone. They last a long time and stay sharp, so you can drill more holes.
- Masonry Drill Bits: These are good for softer tiles. They mightn’t work as well on very hard ceramics, though.
- Spear-Headed Drill Bits: If you’re worried about breaking tiles, use these. They’re made to drill without cracking fragile tiles.
To make sure you don’t ruin the area around the tile, pick the right drill bit for the material you’re working with. For example, if you’re drilling into porcelain, a diamond drill bit is a reliable choice.
If you’re not sure, ask for advice at your local hardware store.
Hammer Drill Safety and Maintenance
To make sure your hammer drill works well and safely, always wear goggles and earplugs. Check the drill for any damage before you start using it, making sure the bit is tight and the power cord isn’t broken. Hold the drill firmly and stand steady to keep it under control and stop it from jerking back.
It’s important to keep the drill clean, especially the air vents, and to check if the brushes inside it are worn out. Follow the maker’s advice to oil the parts that move. Keep the drill in a place that’s not damp to stop rust. Doing these things will help your drill work better for longer, protecting the money you spent on a good tool.
Here are some tips:
- After each use, wipe down the drill with a clean cloth to remove dust and debris.
- If you’re not sure what kind of oil to use for lubrication, check the manual or get in touch with the manufacturer’s customer service for advice.
- When storing, use a tool case or a shelf in a garage or workshop that doesn’t get wet.
This attention to care will keep your hammer drill ready for any job.
Frequently Asked Questions
How Do I Determine When It’s Time to Replace My Hammer Drill Bit When Frequently Used for Tile Removal?
To know when to change your hammer drill bit, look for signs it’s not sharp anymore. If it’s hard to drill into tiles or it’s slowing you down, it’s time for a new bit. A sharp bit makes your job faster and more accurate. For example, if you’re working with tough ceramic tiles and notice your bit is taking twice as long to get through, it’s likely become dull. I recommend using a high-quality carbide-tipped bit for tile removal, as they stay sharp longer. Remember, changing your bit when it gets worn out will save you time and effort in the long run.
Can I Use a Hammer Drill Bit for Tile Removal on Different Types of Tiles, Such as Porcelain or Natural Stone?
Certainly, a hammer drill bit can be used for removing various types of tiles, such as porcelain and natural stone. However, it’s crucial to use the tool with care. These types of tiles are tougher and can easily break if too much force is applied. To avoid damage, regulate the drill’s force and operate at a lower speed. For example, when working with porcelain, a gentle tap with the hammer function on your drill might be enough to lift the tiles without cracking them. If you’re dealing with natural stone, consider using a chisel attachment to carefully pry up the tiles. Remember, patience and the right touch are key to preventing unnecessary breakage and achieving a clean removal.
Are There Any Alternative Methods for Tile Removal That Are as Effective as Using a Hammer Drill Bit?
As you look for different ways to remove tiles, consider a few key alternatives to using a hammer drill bit. Hand tools like a simple hammer and chisel can be just as effective if you use them correctly. An oscillating tool with the right blade attachment can also cut through the grout and lift tiles without too much effort. For larger jobs, a tile stripper machine might be the way to go – it’s a more powerful tool that can handle bigger areas. Understanding how each of these tools works will help you remove tiles efficiently.
Using a hammer and chisel requires patience and precision. You’ll need to carefully chip away at the edges of the tiles and work your way under them to pry them up. It’s a good technique for smaller areas or delicate work. An oscillating tool, on the other hand, is electric and uses a fast side-to-side motion. It’s great for cutting through grout and making the tile removal process smoother.
When you’re dealing with a large room or a whole house, a tile stripper might be your best bet. This is a heavy-duty machine that can lift tiles quickly and is often used in professional tile removal jobs. Just make sure to follow safety guidelines when using such powerful equipment.
To sum it up, yes, there are several alternatives to using a hammer drill bit for tile removal. Each method has its own advantages, and understanding how to use them will yield the best results. Stick to these tools, practice your technique, and you’ll find that removing tiles can be done effectively without a hammer drill bit.
How Does the Noise Level of Using a Hammer Drill Bit for Tile Removal Compare to Other Methods, and What Can Be Done to Minimize It?
Using a hammer drill to remove tile is generally noisier than doing it by hand but not as loud as using a heavy-duty demolition hammer. To make the drilling less noisy, you can wear noise-reducing earmuffs. Setting up sound-blocking panels around the work area can also help to keep the noise down. These measures are important because they help protect your hearing and make the environment more comfortable for others nearby.