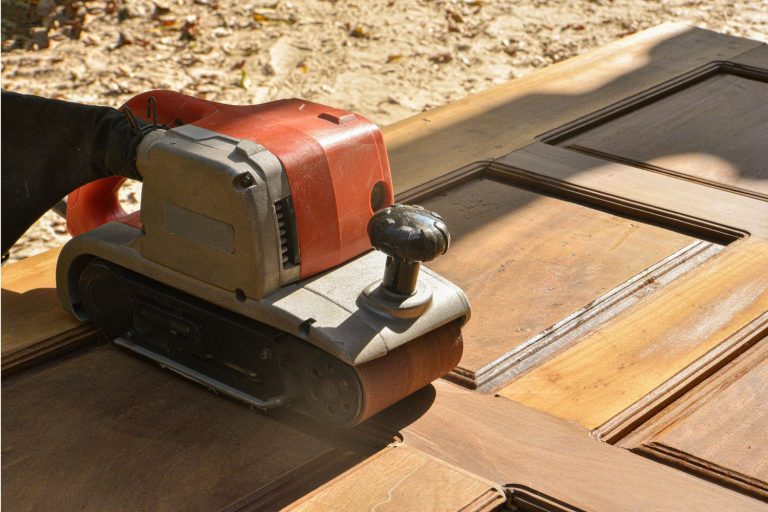
Find the Best Sander for Cabinets and Revive Your Kitchen
From cabinets to countertops, sanding your kitchen’s surfaces is a crucial step in any renovation project.
Whether you’re a DIYer tackling the job on your own or a contractor handling it for clients, selecting the right sander can be key to making sure everything looks uniform and feels smooth during installation.
Finding the best sander for cabinets requires researching different products, weighing their pros and cons, and identifying the appropriate level of power needed for the job at hand.
Thankfully, we’ve done all that legwork for you so that you don’t have to!
In this article, we’ll explain why sanders are essential when restoring tired-looking cabinets and help you figure out which type might be best suited to reviving your dull kitchen.
So buckle up – now’s the time to get excited about bringing life back into exactly what was once looking worn down!
Do you have other sanding projects around the house?
Check out our reviews of the best sanders for deck renewal and the best sanders for furniture refinishing!
If you just need some general purpose tools, check out our reviews of the best palm sanders and the best belt sanders!
How We Choose the Best Sanders for Cabinets
There are a lot of sanders on the market, and it can be hard to figure out which one is the best for your needs.
If you’re looking for a sander to help you refinish your cabinets, there are a few things you need to take into account.
We’ve done the digging for you.
After reading through thousands of reviews on Amazon and researching the features and specs of all of the most popular brands, we’ve narrowed down your choices to five of the best sanders for cabinets.
Best Cordless Random Orbit Sander
Makita XOB01Z 18V LXT® Lithium-Ion Cordless 5″ Random Orbit Sander
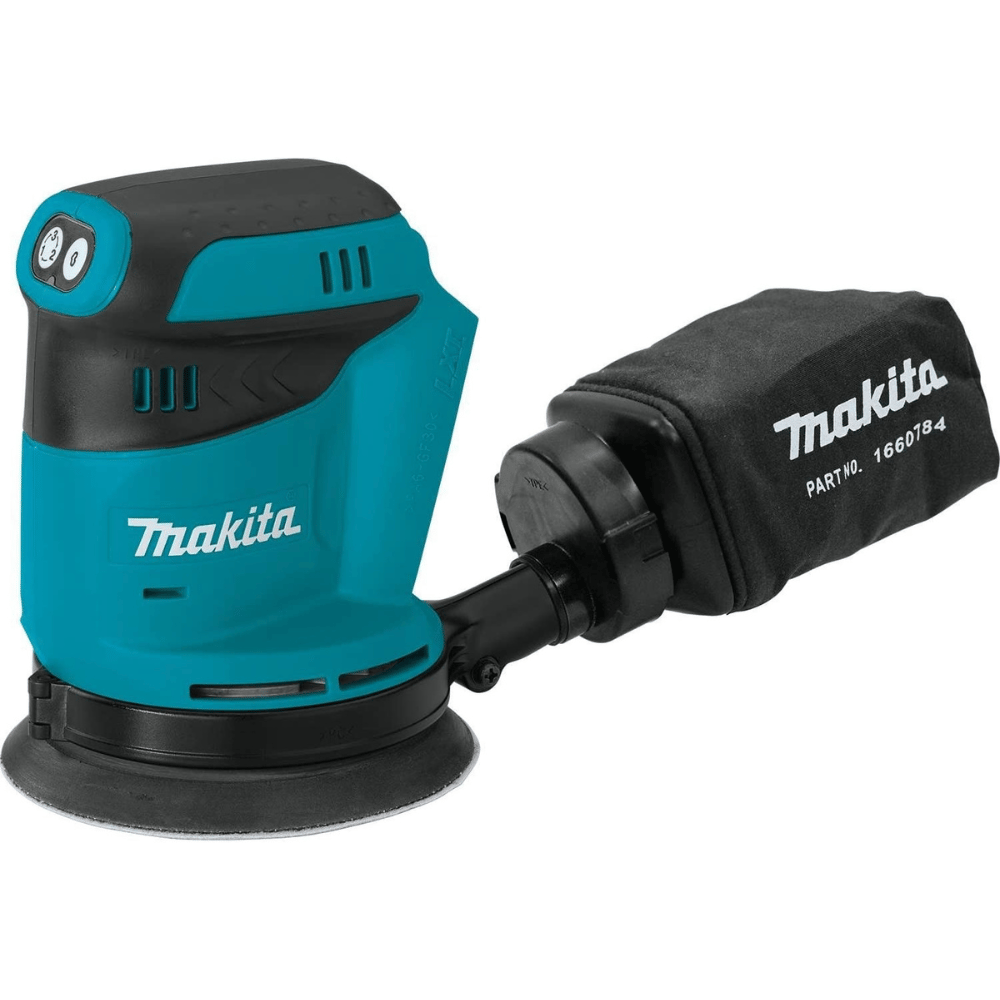
Key Features
- Three speed settings – 7,000/9,500/11,000 OPM
- 1/8″ random orbit action
- Bare tool
Why It’s a Great Choice
The Makita XOB01Z 18V LXT® Lithium-Ion Cordless 5″ Random Orbit Sander is the perfect tool for the serious DIYer, contractor, or woodworker.
This cordless sander is engineered for maximum efficiency and mobility, enabling you to easily move from job to job without the hassle of cords getting in your way.
It features three speed settings – 7,000/9,500/11,000 OPM – which can be changed with one simple touch due to its electronic control switch.
The large 1/8″ random orbit action optimizes sanding power and produces a swirl-free finish without taking too much time.
With its pad brake technology, this sander ensures reduced free spin for an improved overall finish.
Additionally, its control system regulates pad speed during start-up so that you get precision sanding every single time.
And with its quick-change 5″ (8-hole) hook-and-loop abrasive paper system and up to 40 minutes of run time on a single charge, you’ll have everything you need right at your fingertips!
Experience increased productivity and professional results with the Makita XOB01Z 18V LXT® Lithium-Ion Cordless 5″ Random Orbit Sander!
Best Random Orbital Sander for Dust Control
SKIL 5” Random Orbital Sander
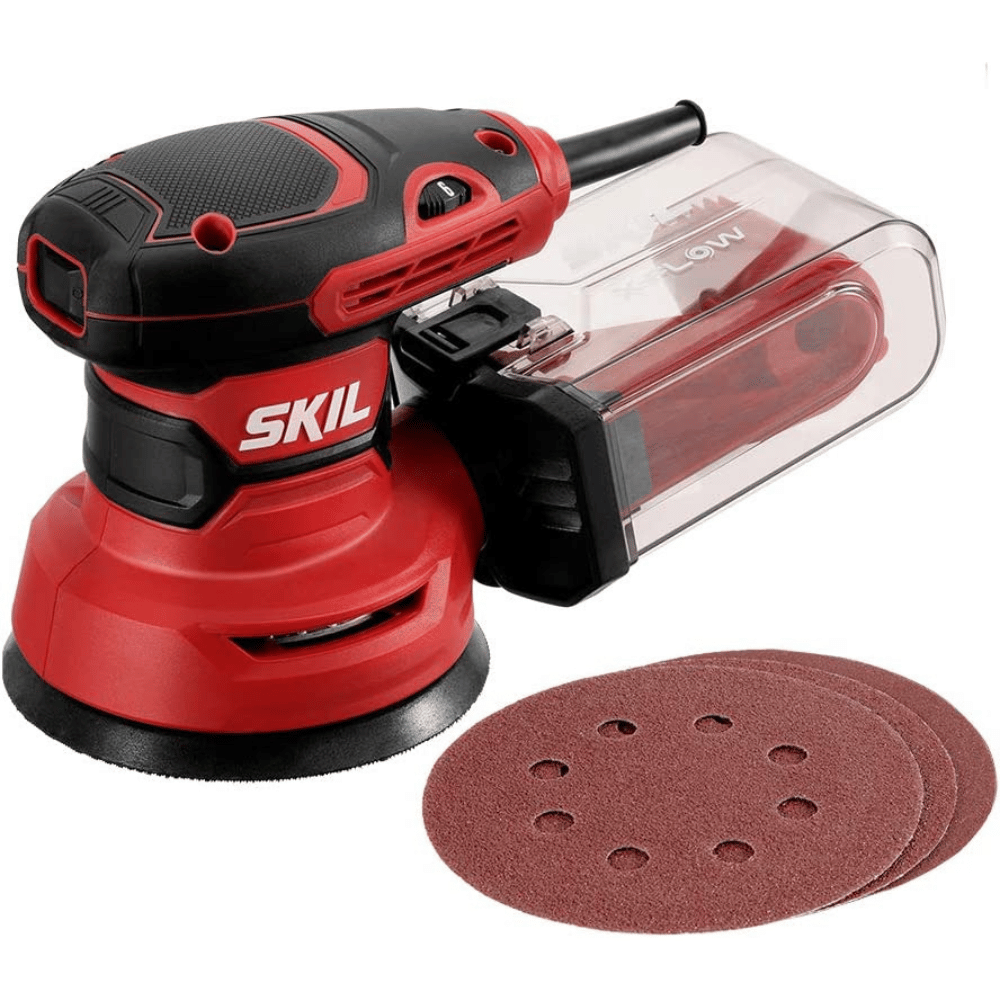
Key Features
- 2.8 amp motor providing 7,000 to 13,000 OPM
- X-flow cyclone force clear dust collector
- Corded tool
Why It’s a Great Choice
The SKIL 5” Random Orbital Sander is a powerful tool built to help you complete your most ambitious kitchen projects.
This sander sturdily delivers low vibration and professional-grade results, powered by its variable speed control, which provides just the right amount of power and control across different materials.
Featuring an ergonomic design and soft rubber grip, it gives you exceptional access to tight spaces while keeping your hands comfortable and fatigue-free.
With the dust container’s cyclone force X-flow capabilities, cleanup afterward is as simple as emptying the transparent container.
Get your cabinets done with exceptional results – made possible by this reliable everyday sander from SKIL.
Best Budget Random Orbital Sander
BLACK+DECKER 5-Inch Orbital Sander
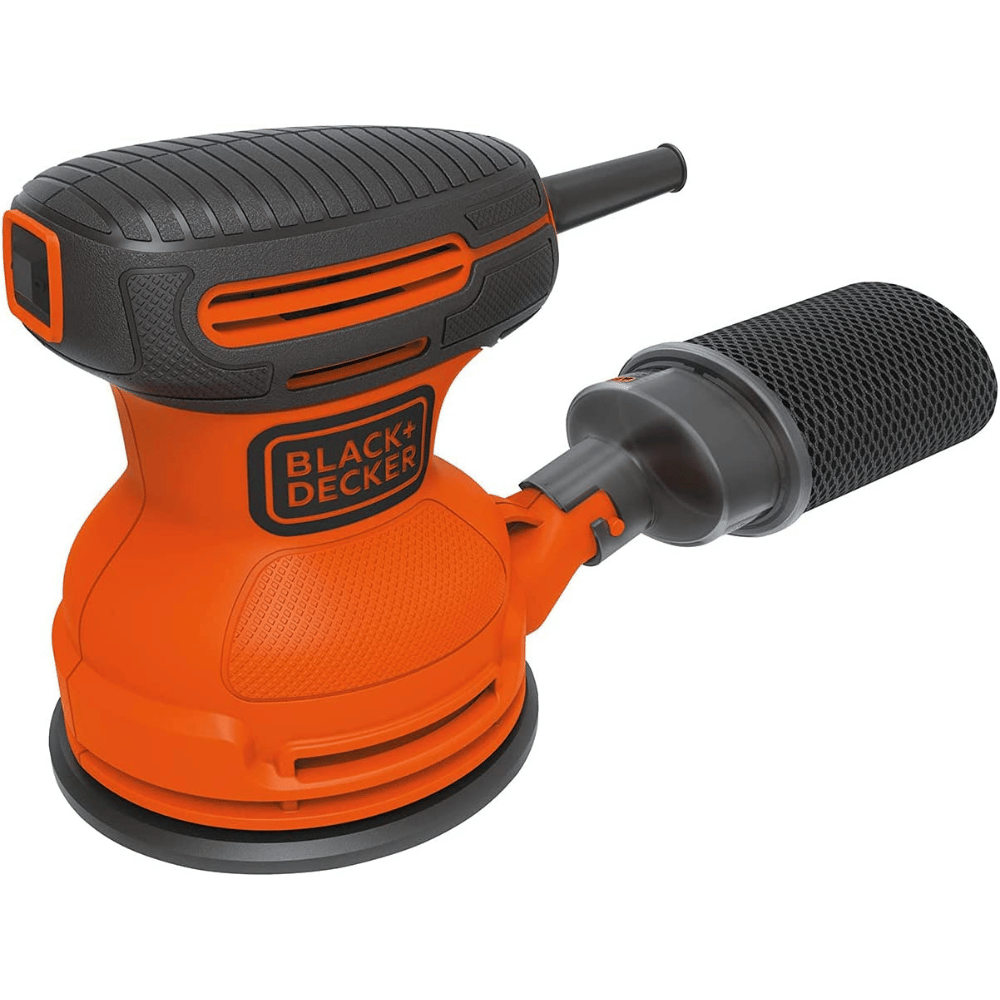
Key Features
- 2.0 amp motor delivering 12,000 OPM
- Easy removal dust collection system
- Corded tool
Why It’s a Great Choice
For the most efficient and accurate finish on your DIY projects and home repairs, trust the BLACK+DECKER 5-Inch Orbital Sander.
This lightweight and compact sander is perfect for any contractor or DIYer that needs to get a smooth finish without much effort.
With 2.0 Amps of power and up to 12000 orbits per minute this sander was designed specifically for those who demand results with minimal cost.
Making sanding easy, this versatile tool features a hook-and-loop system for easy sandpaper changes, as well as a handy lock-on paddle switch, so you won’t need to continuously press down on the trigger during large projects.
The soft grips make it comfortable to hold for extended periods, giving you more control over your project and less fatigue in your arms.
Get the BLACK+DECKER 5-Inch Orbital Sander today and have unparalleled results with minimal effort.
Best Cordless Detail Sander
Milwaukee M12 FUEL 12-Volt Lithium-Ion Brushless Cordless Orbital Detail Sander

Key Features
- POWERSTATE brushless motor delivers 14,000 max OPM
- Lightweight – 1.3 lbs
- Battery and charger included
Why It’s a Great Choice
For a faster, more efficient sanding solution in small detail areas, choose the Milwaukee M12 FUEL 12-Volt Lithium-Ion Brushless Cordless Orbital Detail Sander.
Thanks to its POWERSTATE Brushless Motor and REDLINK PLUS intelligence system, this orbital detail sander lets you quickly remove material up to two times faster than other available hand sanders on the market.
Plus, it features an orbital eccentric motion with a 1.5 mm orbit diameter that delivers a clean, consistent stain-grade surface finish for ultimate accuracy.
Make difficult cabinet jobs easier with its special pad shape that allows for sharp, straight edges and access even into confined corners.
To further improve your experience this sander also comes equipped with a sponge pad that contours to the work surface for sanding complex profiles
Get durable professional results reliably with the Milwaukee M12 FUEL Orbital Detail Sander – it’s perfect for DIYers and contractors alike!
Best Detail Sander on a Budget
WEN 6301 Electric Detailing Palm Sander
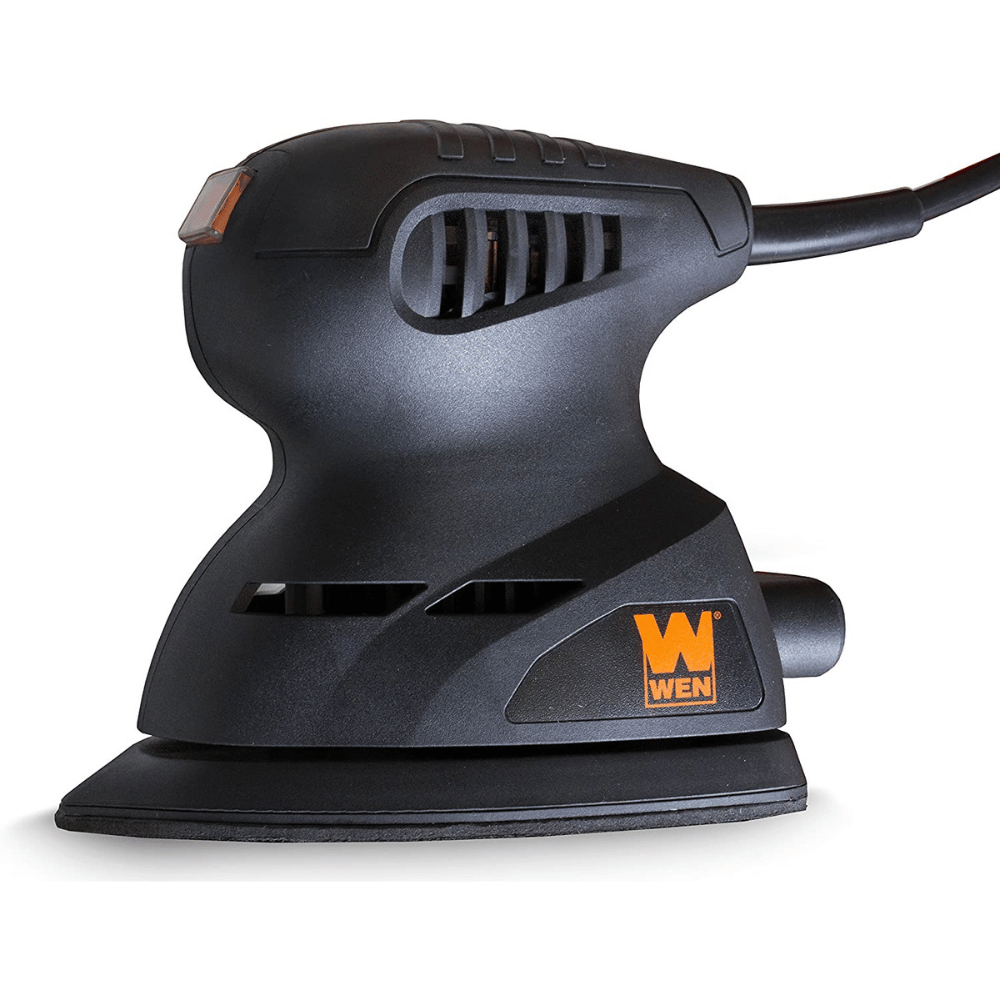
Key Features
- 1 amp motor provides 13,500 OPM
- 3-3/4 x 5-1/2 inch pad with an angled tip
- Corded tool
Why It’s a Great Choice
Get superior sanding performance with the WEN 6301 Electric Detailing Palm Sander.
It’s 3.75 x 5.5-inch sanding pad has fan-assisted dust collection and an angled tip for reaching tight corners, ensuring you get that perfect finish every time.
The ribbed rubber backing maintains a firm grip in your palm while an easy hook-and-loop base pad allows for quick sandpaper removal and installation when changing grits.
Get cleaner results, faster, with the included vacuum adapter which attaches to any standard dust collection device or vacuum hose.
The durable 1 amp motor delivers 13,500 orbits per minute—so DIYers and contractors alike can trust the WEN 6301 Electric Detailing Palm Sander to get the job done right and fast.
Buyer’s Guide to the Best Sander for Cabinets
Finding a sander to refinish cabinets can be an intimidating task.
There are so many different types of sanders on the market, it can be hard to know which one is right for you.
Not only is it difficult to choose the right sander, but it’s also tough to figure out how to use it properly.
If you’re not careful, you could end up damaging your cabinets instead of sanding them.
We’ve put together this FAQ to help make choosing and using a sander for cabinets easier for you.
Here you’ll find information about the different types of sanders available, as well as tips on how to use them correctly.
Is an electric sander better than a manual sanding block for sanding cabinets?
When it comes to finishing cabinets, an electric sander can offer several advantages over a manual sanding block.
First and foremost, electric sanders are much faster than manual sanding blocks. This means you can complete your project in a fraction of the time it would take with a manual sander. The speed of an electric sander also allows for more consistent results, reducing the likelihood of uneven or patchy surfaces.
Electric sanders also come in a variety of types, including belt and random orbital sanders, each with its unique benefits. Random orbital sanders are great for finishing work and getting into tight corners and crevices, while belt sanders are better suited for larger surface areas that need to be stripped down quickly.
Another advantage of electric sanders is that they often come with dust collection systems that help keep your workspace clean. This is especially important when working on cabinets since sawdust can quickly accumulate and cause a mess.
While manual sanding blocks do have their place in certain situations (such as fine hand-sanding), they simply cannot match the efficiency and speed of an electric sander. Additionally, using a manual sander for prolonged periods can lead to fatigue and strain on your hands and wrists.
Overall, if you’re looking to sand cabinets quickly and efficiently with consistent results, an electric sander is likely your best option.
What type of electric sander is best for cabinets?
When it comes to sanding cabinets, there are a few different types of electric sanders that can be used. However, the best type of sander for cabinets will depend on the specific needs of your project.
For most cabinet sanding projects, an orbital sander is the best option. Sometimes called a finishing sander, these are great for finishing work and getting into tight corners and crevices. They also produce fewer swirl marks than other types of sanders, which can be important when working with wood that has a lot of grain.
When choosing an orbital finishing sander for finishing cabinets, look for one with a small pad size (around 5 inches) as this will make it easier to maneuver in tight spaces. A variable speed control is also useful as it allows you to adjust the speed based on the type of wood you’re working with.
Another option for cabinet sanding is a belt sander. These are better suited for larger surface areas that need to be stripped down quickly. However, they can be more difficult to control and may remove too much material if not used carefully.
If you do choose to use a belt sander for your cabinet doors, look for one with a narrow belt (around 3 inches) as this will allow greater precision when working on smaller areas.
In summary, a random orbital sander is typically the best option for cabinet sanding due to its ability to produce consistent results in tight spaces while minimizing swirl marks.
How powerful should my sander be for cabinet sanding?
When it comes to cabinet or furniture refinishing, the power of your sander is an important consideration. While you want a sander that’s powerful enough to get the job done efficiently, you don’t want one that’s so powerful it damages your cabinets.
For most cabinet sanding projects, palm sanders with a motor in the range of 1-2 amps is sufficient. This will provide enough power to remove old finishes and smooth out rough spots without damaging the wood.
However, if you’re working with particularly hard or thick wood, or if you have a large amount of material to remove, you may want to consider a more powerful sander. In these cases, a motor in the 2-3 amp range may be necessary.
It’s important to keep in mind that while more power can make sanding easier and faster, it can also increase the risk of damage to your kitchen cabinets if not used carefully. It’s always better to err on the side of caution and choose a slightly less powerful sander if you’re unsure about which one to use.
In addition to considering motor power, look for other features that can help control the speed and force of your sander. Variable speed controls allow you to adjust the speed based on the material being worked on, while dust collection systems can help keep your workspace clean and protect against sawdust buildup.
Ultimately, when choosing a sander for cabinet sanding, consider both its power and other features that will help ensure safe and efficient operation.
What grit sandpaper should I use for cabinet sanding?
When it comes to sanding cabinets, the sandpaper grit you use is an important consideration. The right grit can help you achieve a smooth finish without damaging the wood, while the wrong grit can leave behind scratches and marks.
For most cabinet sanding projects, it’s best to start with a medium-grit sandpaper around 120-150 grit. This will allow you to remove any old finishes or rough spots on the surface of your cabinets without causing damage.
Once you’ve smoothed out any imperfections with the medium-grit sandpaper, move on to finer sandpaper, around 220-240 grit. This will create a smoother surface and prepare it for finishing or painting.
If you’re working with a particularly rough or damaged wood surface, you may need to start with a coarser-grit sandpaper of around 80-100 grit before moving on to the medium and fine-grit papers.
It’s important to keep in mind that while finer-grit sandpapers produce a smoother finish, they also remove less material. If you’re struggling to get rid of deep scratches or stains, don’t be afraid to go back down to a coarser-grit paper and work your way back up again.
In addition to considering grit, look for other features that can help control dust and protect against clogging. Some types of sanders have a built-in dust collection bag that can help keep your workspace clean and prevent sawdust buildup from interfering with your work.
Ultimately, choosing the right grit of sandpaper depends on the specific needs of your project. By starting with a medium-grit paper and working your way up as needed, you’ll be able to achieve smooth results without damaging your cabinets.
Is it necessary to remove the cabinet doors and drawers before sanding them?
When it comes to cabinets, there is no single answer to the question of whether or not you need to remove the doors and drawers. The decision ultimately depends on the specific needs of your project.
In some cases, leaving the doors and drawers attached can make sanding easier and more efficient. This is particularly true if you’re working with a large number of cabinets or if you’re sanding a surface that’s difficult to reach from multiple angles.
However, removing a cabinet door or drawer can also have its advantages. For one, it allows you to sand each piece individually, ensuring that every surface is smooth and consistent. It also makes it easier to access hard-to-reach corners and edges that might be missed if the doors are left in place.
Ultimately, whether or not you remove the doors and drawers for your cabinet sanding project will depend on your personal preferences as well as any specific challenges presented by your cabinets. If you do choose to remove them, be sure to label each piece carefully so that they can be reassembled correctly when you’re finished.
It’s worth noting that regardless of whether or not you choose to remove the doors and drawers for sanding, it’s important to take steps to protect them from dust and debris during the process. Cover them with plastic sheeting or drop cloths, or consider moving them out of the work area entirely until you’re finished.
Do I need to wear any protective gear when using a sander on cabinets?
When using a sander on cabinets, it’s important to take appropriate safety precautions to protect yourself from potential harm. This includes wearing the right protective gear.
One of the biggest risks when sanding cabinets is exposure to harmful dust and debris. Sanding can create fine particles that can irritate your eyes, nose, and throat, as well as cause long-term respiratory problems if you’re not careful.
To protect yourself from dust and debris, it’s recommended that you wear a dust mask or respirator while sanding. These devices will help filter out airborne particles and keep your lungs clear.
In addition to a dust mask or respirator, you may also want to consider wearing safety goggles or glasses to protect your eyes from flying debris. Gloves can also help prevent cuts or scrapes while handling rough surfaces.
It’s also important to take steps to prevent accidents while using a sander. Make sure the work area is well-lit and free of clutter, and avoid wearing loose clothing or jewelry that could get caught in the machine.
Overall, taking these precautions can go a long way toward ensuring that your cabinet sanding project is completed safely and successfully.
How often do I need to change the sandpaper on my sander when working on cabinets?
The frequency with which you need to change the sandpaper on your sander when working on cabinets will depend on several factors, including the size and scope of your project, the type of sander you’re using, and the condition of the sandpaper itself.
In general, it’s a good idea to keep an eye on your sandpaper and change it out as soon as it starts to show signs of wear or damage. This might include fraying around the edges or visible scratches that are impacting your ability to achieve a very smooth finish.
Some experts recommend changing your sandpaper after every 15-20 minutes of use, while others suggest doing so after every few passes over the surface being sanded. The key is to pay attention to how well the sandpaper is performing and make adjustments as needed.
It’s also important to choose the right grit for your project. Coarse grits (such as 60 or 80) are typically used for heavy-duty sanding or removing old finishes, while finer grits (such as 120 or 220) are better suited for finishing work or smoothing out rough surfaces.
Ultimately, changing your sandpaper regularly can help ensure that you achieve optimal results when working on cabinets. By keeping an eye on its condition and choosing the right grit for your needs, you can create a smooth and professional-looking finish that will last for years to come.
What features should I look for in a cabinet sander?
When shopping for a cabinet sander, there are several key features to keep in mind to help ensure that you get the best tool for your needs.
One of the most important factors to consider is the type of sander. There are several different types available, including belt sanders, orbital sanders, and random orbit sanders. Each has its strengths and weaknesses, so it’s important to choose one that is well-suited for the specific tasks you’ll be performing.
Another important feature to look for is variable speed control. This allows you to adjust the speed of the sander based on the task at hand, giving you greater control over your work and helping you achieve more precise results.
Dust collection is also an essential consideration when choosing a cabinet sander. Look for models with effective dust collection systems that can help reduce airborne particles and keep your workspace cleaner.
Other helpful features may include ergonomic handles or grips that make it easier to hold and maneuver the sander, as well as easy-to-use controls or switches that simplify operation.
Finally, be sure to consider factors such as price, durability, and brand reputation when making your selection. By carefully evaluating each of these features in relation to your specific needs and preferences, you can find a cabinet sander that will provide reliable performance and excellent results.
Are there any specific techniques or tips that can help me achieve the best results when using a cabinet sander?
Yes, several techniques and tips can help you achieve the best results when using a cabinet sander.
First, it’s important to choose the right grit sandpaper for your specific task. Coarser grits (such as 60 or 80) are better suited for removing material or old finishes, while finer grits (such as 120 or 220) are ideal for smoothing surfaces and finishing work. Using the wrong grit can result in uneven or rough surfaces.
Next, take care to move the sander in a consistent pattern across the surface being worked on. Randomly moving the sander around can lead to swirl marks and other imperfections. For best results, move the sander in straight lines with the grain of the wood.
Be sure to keep the sandpaper clean and free of debris by periodically tapping it against a hard surface or using a cleaning tool designed for this purpose. This will help ensure that it continues to perform optimally.
When sanding edges and corners, be careful not to apply too much pressure or you may end up rounding them off. Instead, use light pressure and make multiple passes until you achieve your desired level of smoothness.
Finally, consider using progressively finer grits of sandpaper as you work towards your final finish. This will help ensure that each successive pass removes any scratches left by previous passes and leaves behind an increasingly smooth surface.
By following these techniques and tips, you can achieve professional-quality results when using a cabinet sander.
Choosing the Best Sander for Cabinets
All in all, these are certainly the top 5 sanders for kitchen cabinets based on customer reviews and ratings.
While different sanders might work better for people’s needs, these should be tried and considered first when shopping for a tool to do the job.
If you need to refurbish your kitchen cabinets or are just beginning a DIY project, don’t wait any longer – click the links to Check Prices on Amazon and order yours now!